Wednesday, August 13, 2008

Eeep, is that a toy or a laptop?


Sometimes I get emails from readers asking me why I hardly ever review products such as laptops and other fancy techno toys. The answer is simple: until a few weeks ago, I did not own a laptop and I don’t like to write about something I haven’t personally tinkered with. So now I bought the dinkiest laptop currently making tsunami waves. It’s called Asus Eee PC (pronounced “A Seuss E P C”) and it’s so tiny, the jury is still out on whether it’s allowed to call itself a laptop. Its weight (less than 1kg) along with its ease of use and reasonable price tag (around R3500 for the 4G model) make it an ideal starter PC for students and scholars. There are also no hidden costs involved when it comes to software, it prefers GNU Linux instead of Windows and OpenOffice instead of Microsoft Office which are open source and free packages that adequately cover general user needs. These packages come preloaded as there is no CD/DVD drive from which to load them. Any additional software or access to data would need to either be downloaded from the web, or sucked off a memory stick, external hard drive or an SD card. It has three USB ports, a monitor output (which works, I tried it), an Ethernet port as well as a headphone and a microphone jack, even though there are speakers on board and a microphone pick up. Instead of a lumpy carry case, it comes with a lycra slip sock which feels like it was made from diving suit off cuts. They say it’s pretty robust, but I can’t bring myself to dropping it to test that statement.

I bought it for it’s portability: it will fit in my travel bag.
I bought it for it’s entertainment value: I can play multimedia files on it, including divx movies.
I bought it for it’s ability to stay in touch: It comes loaded with an internet browser and email as well as Skype and has built in wireless which searched and found my home ADSL connection without too much fuss. It also has a webcam.

Is the Asus Eee PC the trendiest answer for a business person who is always on the go? Not as a total PC replacement as there are a few prohibitive drawbacks:

The battery life is below average (they promise about 2 to 3 hours, but under intensive use count on an hour and a half), the keyboard is quite cramped and does not allow for fast nor accurate typing, the spacebar is a bit sticky and it only has between 2 and 4Gb of internal hard disk space, more than half of which is taken up by the operating system and the preloaded programs it ships with (including a number of games). Internet browsing and word processing is also a bit of a keyhole experience due to the 7” display.

For my immediate needs though, it’s perfect.

There is a bit of finality in me writing today as I will be taking a break from geek articles. I have, over the years, been humbled by the enthusiasm and support from geek article readers and I would like to express my gratitude. Many articles have been spawned by a tip, a chat or a need from people I’ve come in contact with and in this way I’ve come to learn about (and hopefully impart) useful computer related tools. My mission in life right now is to stay one step ahead of my offspring, who is already nipping at my heels, pushing me aside asking to play computer games. Maybe I’ll just hand over the Asus right now and be done with it?

Wednesday, July 30, 2008

Read, computer, read!


You could say I’m lazy. I could tell you that I like to work smart, not hard. We could debate the viewpoint while my computer does my work for me. Like recently, when the need arose to create a 16 page legal agreement, and there was only a printed hard copy to work from. I searched for a sneaky way out of having to type up all 16 pages again and discovered that my computer can read! I was pleasantly surprised and set it straight to work. Using an ordinary scanner, I scanned all pages into my computer using the black and white 300dpi or higher setting. Then I told the computer to go forth and recognise. I now know that the term scientists use is OCR which stands for optical character recognition and it is “the mechanical or electronic translation of images of handwritten, typewritten or printed text (usually captured by a scanner) into machine-editable text.” (sic Wikipedia).

Using the easy OCR wizard that came as part of the OmniPage software, which in turn shipped free with my Canon scanner, I was walked through the four steps of text recognition. These steps are: Start Processing (open program), Get Pages (scan document), Perform OCR (read, computer, read) and Export Results (dump text into MS Word). My printed template was recognised reasonably well; I would say it had 96% recognition and turned a scanned page of photocopied text into a page of text that I was then able to bring into my word processor and manipulate. The text layout was a bit all over the show, as bullet points and indents were wonky in places, but unless you’re a formatting fanatic, you could get by. As George and Fred Weasley would say: “Mischief Managed!”

Ever inquisitive, that made me wonder how well the OCR software would read my handwriting. Bad move, or shall we say: bad handwriting. Normally totally illegible, I put on my Sunday best and tested if the PC could make head or tail of it. My attempts failed miserably. When I wrote “Witness Geek”, the computer insisted I had said Wkne.’s Gee. My husbands attempts at “THE CAT IS BLACK” came back slightly better with the computer quoting “THE CAT IS LAC-K”. And that was written in bold painstakingly clear lettering that took both of us longer than it would have taken us to type a paragraph. So as for using this as solution to dump your lecturing notes, X-Nay, I’m afraid.

I got playful and took a photograph of my computer screen with this article open. I turned the photograph into a tiff file using my favourite photo manipulation program, FastStone, and told the computer to read, boy! I was pleasantly surprised that it came back with a very good rendition, the parts that were clear the OCR recognised 100%. So if there are any James Bond type spies out there, take note.

Doing a bit more reading on the internet to see what other people have discovered, I read that Microsoft Office ships with it’s own OCR facility inside Microsoft Office Document Imaging. Check to see if you have the program, too by clicking on Start, All Programs, Microsoft Office, Microsoft Office Tools, Microsoft Office Document Imaging. This program can view, manage, read and recognise text in image documents and faxes as well as reading documents straight off the scanner. I found it to actually work better than OmniPage.

Tuesday, July 15, 2008

Treasure hunt on the Internet


Online File Sharing / Storage and Collaboration

Being secretary to a local woman’s’ association, I found that administration of, and tending to a huge database needed a plan B. I wanted a virtual place where I could squirrel away files so that they could be reached from any interface, in case our house burnt down (heaven forbid). That way the data files would still be retrievable even if the furniture wasn’t. Yes, backup CD’s or flash drives are good, but a burning house is no place for backup CD’s either. I wanted a Swiss bank account, of sorts, an offshore investment.

I trawled the net and thought that Google could help, but for once, they were not the front runners. I found a local survey which recently put it out to the users to vote for their favourite online file sharing services. There are various offers out there, amongst them Windows Live SkyDrive, FolderShare and FileFront. I investigated what came back as their favourite: Box Net.

www.box.net has a rather apt byline of “Store here, access anywhere”; you immediately get the general picture.

I’ve also watched too many action thrillers where the hero sends important files via email to a safe and secret place, or retrieves it likewise. I signed up with Box Net and chose the “Lite” option which allows me 1Gb of online storage space for free. If you sign up, too, beware that Box Net will try and urge you into the paying version, but if 1Gb is plenty space for you, don’t be fooled and stick to Lite.

Once the account is set up, click on the My Files tag and create a new folder or several folders or even subfolders. Via an easy-to-use interface, you’re able to upload any type of file to that folder, be it zipped files, photos, spreadsheets, documents or presentations.

The most important concept I had to wrap my mind around was that of “Collaborating”. Box Net has evolved according to users needs since 2005, and beyond the immediate virtual safety deposit box functionality, the website offers different users the ability to update files, too.

For example, a think tank document can be edited online by anyone with collaboration rights. These collaboration rights are assigned by the owner of the folder and hold true for all information within that specific folder. Of course you do not hand out your username and password to people who you want to view your files, you don’t need to. Let them set up their own username and password (for free) and you just rope them in as collaborators via an email invitation. Updating one document online eliminates the annoying “out-of-synch” upshot that a document would be reduced to that has been emailed backwards and forwards between a number of people. As soon as an update occurs, an email is sent out informing all collaborators. Comments and tags can be added and the online document edit feature is called Zoho, which allows you to open and edit the documents even if the computer you are working from hasn’t got MS Word or Excel loaded.

In this way you can share one folder with your work colleagues and another with your fellow stamp collectors and a third folder that you create can be for important family documents or address books.

Further uses of Box Net can include photo sharing or a place to plonk files that are too big to email. Also, if you have dabbled on eBay or bid or buy, you will know that you are expected to upload a photo of your goods, and Box Net is a perfect suppository for these photos. Box Net has an easy button which generates the URL, that you place as the link in Bid or Buy.

Wednesday, July 2, 2008

Brabys has gone Digital, let’s catch up


The printed Brabys Directory has been a household item for over 30 years and I’m sure you’ve got a copy floating around your house as much as I have.

A C Braby (Pty) Ltd went digital in 2005, going into cahoots with Always Active Technologies(Pty) and Business Connextion (Pty) Ltd to launch Brabys Maps at www.brabysmaps.co.za . This is a most handy website for anyone needing to find their way around South Africa’s metros.

On the homepage you are welcomed by a map of South Africa and expected to click on a province. Brabys then loads a zoomed in version of the province and now you can specify a city or county. Only red-rimmed areas have Brabys maps loaded, so outlying areas such as Wartburg are unfortunately not yet uploaded, but Pietermaritzburg, Lions River, Umngeni, Howick, Midmar Nature Reserve, Merrivale, KwaMavana and Edendale are mapped. Now you are guided into ever closer maps, until you are at street level. Street names, suburbs and highways are clearly marked and you are able to immediately print or email the map for your own (non-commercial) use. This is a brilliant budget GPS tools for those of us whose pocket doesn’t stretch as far as an on board Garmin.

You can check a larger view of the map area which is 500 x 350 pixels, with a zoomed effect adjusting to 758 x 758 pixels. Zooming in or out can be done with the slider on the left.

If you want more than a quick map, here are some extra features BrabysMaps offers: you can switch any map to an Aerial View, or you can click on a particular location in the map and read the GPS coordinates off at the top. So you can even pass on the GPS coordinates to a Garmin owning advancing visitor and ease their way to you.

But wait, it gets better. Switching to the Directions tag at the top of the window allows you to put in two locations (A and B) and BrabysMaps will find you a route from the one to the other, with each turn and distance clearly marked. You can even choose different routes. Again, the result can be emailed or printed. Yep, free of charge.

In the top right corner is a blue windows which lists businesses by category. Choosing a category, for example Accommodation, and a subcategory such as Hotels & Other Accommodation, you will see red dots at certain places on the map where businesses in these categories are located. Hovering over the dots shows the business’ name and if you click on this, BrabysMaps will fetch all loaded details for this business.

But why stop there? If you ever wanted to know how far a crow flies as opposed to the extra miles streets add to our mode of transport, click on the How Far tag and again put in two locations before you hit the Calculate button. You will see the “As the crow flies” distance versus “Travel distance” as well as an estimated travel time.

If you find yourself using this website lots, you can register and bookmark your favourite places and routes for frequent and quick retrieval.

I was even able to embed a map into another website, giving ululations to BrabysMaps. This was made easy by a tool that allowed me to copy the javascript (aka doubledutch) which magically displayed the map on the other website. I did have to tell BrabysMaps my name and the website I pasted their map into. That’s a fair exchange, if you ask me.

Brabys disclaimer notes that its contents is proprietary to Brabys and only for general information and use, not for commercial use.

Wednesday, June 18, 2008

Grand finale to geek trilogy on video’s


Upfront, let me share a handy site a colleague pointed out to me recently: www.tinyurl.com . What this site can do for you is convert an impossibly long URL into a bite size one, small enough to memorize.

So if you liked the idea of ripping DVD’s touched upon in my previous geek installment, surf to http://tinyurl.com/4re28l (that last digit is L as in Longbottom) and watch an interesting expanded “How-To” that worked for me.

But on with the show and the third and final part of my video explorations ended with me finding a video editing program for free. It’s called Pinnacle VideoSpin and does what Microsoft Movie Maker can (or can’t) do. Download this spyware devoid software from http://tinyurl.com/4zvnez but give it time, it’s big: 150Mb in fact.

Once installed, it allows you to take video clips you have kicking around on our PC and intertwine them with nice titles, background music and transitions and voiceovers to round it all off. You can even string a photo slide show together using this software. You could also make one clip out of a handful of YouTube favourites or mix and match them with your own home videos and photos.

There are six basic and user friendly Album enhancements, all of which are activated from the icons on the left hand options. These are Video, Transition, Titles, Photos, Sound effects and Music. Click on each in turn, make your choice and drag it into the timeline at the bottom of the screen.

You can personalise the titles and even trim video’s, music and transitions. The preview on the right shows you a trailer of the final product.

Once you click on “2 – Make Movie”, you can choose avi as file type and hit Save. It will output an avi file that can be watched on a media player on your computer.

If you, like me, sometimes take video clips under poor lighting conditions, there is an enhancement available under “Settings” and “Options”, during step 2. It allows for a very basic Brightness and Contract correction, but don’t expect miracles. Take note that this will change all video clips’ settings in the current range, even ones that are not under exposed.

Pinnacle’s limitations are that after 15 days the program won't allow you to create nor edit MPEG-2, MPEG-4/DivX or Dolby Digital 2 Channel files anymore, but the avi’s and other features will still work.

So why would such a cool product be free when the cheapest video editing software goes for about R1000? Because it doesn’t have too many effects. For example colour correction or old film style. Pinnacle VideoSpin doesn’t have fancy panning and zooming on photographs like they do on TV and sometimes the program hangs if you’re overloading it, so save often. Luckily, even if you crash out of the program, it remembers where you were the next time you open it, so you don’t loose much work.

The good news is that if you like the freebie that much, you can pay and upgrade to all of these snazzy features. And now you know why the company is throwing VideoSpin out there for free: in order to get you hooked on Pinnacle products.

Another bit of handy info is that there is a comprehensive Frequently Asked Questions website for all your spin needs available at www.videospin.com/faq.asp

Tuesday, June 3, 2008

Converting PC multi-media to a DVD movie


If AVI and Codecs have you spinning on the spotex, readex this and clear up the jargon.

In a recent article, I unraveled how to save YouTube videos to your computer (www.witnessgeek.blogspot.com), but I was seriously disappointed when burning the downloaded video file onto a CD and trying to play it back on my regular DVD player did not produce the desired results. I found out that I could not watch an avi file on an ordinary dvd player. Looking for solutions I discovered that video formatting can be a can of worms.

Trends change and move rapidly but at this moment the multi-media container (video format) of choice for computer viewing pleasure in my immediate circles seems to be AVI, which stands for Audio Video Interleave. This means that the video file will have an .avi extension and most media players such as Windows Media Player will be able to play it on your computer. The same cannot be said for playing DVD movies on computers. Yes, my computer allows me to open and view the .vob files that make up your normal DVD movie, but older media player versions frequently cannot. The done thing, and I speak for non-copyrighted movies only, you understand, is to convert the DVD movie to an avi format. This process is called “ripping to your hard drive” and has one other major advantage: a more manageable file size.

Other video file formats gaining favour are mp4, Windows Media wmv, Flash video .flv, Quicktime .mov and Mobile phone format such as .3gp and .3g2.

Many programs can be used to “rip”; some are pay software and some are not. NERO, which ships standard with most DVD Rom drives, has the ability to “rip”.

These programs use codec to rip. Codec stands for Coder/Decoder. Basically it is a piece of software or a driver that adds a support for certain video/audio format for your operating system. With codec, your system recognizes the format the codec is built for and allows you to play the audio/video file (=decode) or in some cases, to change another audio/video file into that format (=(en)code).

Compressing movies in this way has the lovely advantage of allowing about ten hours of viewing to fit onto one DVD. Imagine a 320Gb external hard drive filled to the brim with series, movies and your favourite programs that you are able to take to friends and plug and play for a slumber party. Aha, I hear you say, that sounds like fun.

But now lets look at bringing a computer friendly video format file such as an avi back to a format that ordinary DVD players can play back on your TV. For example a YouTube video you have recently downloaded. Here you are looking to convert to a vob format, inclusive of the correct video and audio folder creation, as well as info and backup files that make up the normal DVD movie setup. Again, there are many software packages out there, but the one I found to work and for free is called Sothink Movie DVD Maker and it can be downloaded from www.sothinkmedia.com . Once installed, it can convert several movie files at once and it can even burn you a DVD in one foul swoop. Alternatively you can create a temporary folder on your hard drive to be burnt onto a removable medium later.

A wise word from someone who has wasted many, many DVD’s: Don’t try this on an underpowered computer and start with short movies and see if there are video versus audio synch problems when you play this back on the DVD player. They don’t sell computers aimed at videography with all the RAM and processor bells and whistles for nothing and your entry level PC might struggle.

Next time: Completing the trilogy on movies: how to do some video editing for free!

Thursday, May 8, 2008

Let’s watch a movie, or lots of little movies


I, like many other enthusiasts, enjoy looking surfing interesting YouTube videos. From the first ever episode of the original Teenage Mutant Ninja Turtles to a documentary on how to play the bagpipes, you can find it on www.youtube.com.
But I don’t want to have to view it off the website all the time. I want to download it and view it at my leisure, on different computers, without having to eat into my monthly download cap and, most convenient of all - without the jerkiness that can be the plight of the entry level broadband.

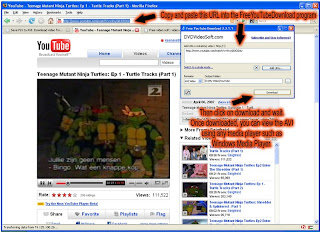
I’ve done quite a bit of net trawling and I’ve tested numerous software packages that promise but don’t deliver only to finally hit paydirt. www.dvdvideosoft.com has, amongst various other interesting packages, a program called FreeYouTubeDownload.exe version 2.2.1.1, which clocks in at 5.6Mb. Download it and install it to start your epic collection of YouTube clips.

Launch FreeYouTubeDownload and open up www.youtube.com . Once you’ve found a video clip you would like to download, ensure that the clip is the active clip because you are going to need to copy and paste the cryptic link which you will see in the Address bar at the top. It looks something like this: http://www.youtube.com/watch?v=9xyG0JCtDzU . So highlight the link and press Ctrl+C to copy it. In the FreeYouTubeDownload program, click in the window which says Input URL containing video and press Ctrl + V to paste the link in. Check that the Output format is AVI (which seems to work the best) and that the destination for the output file is somewhere where you will find it again. Other output formats available are MP4, 3GP or FLV files.
Now click on download and wait for the clip to download. Clips are usually short, I think this is because the sound versus video synchronisation goes a bit loopy if the clip is too long. So if a whole episode of Teenage Mutant Ninja Turtles has been uploaded, you might find that they have been cut into two or three bite size chunks to avoid sync problems. You will need to find all the parts and download them one by one.

Back to Teenage Mutant Ninja Turtles and the downloaded avi you should now have on your computer. This avi can be played with a media player such as Windows Media Player. Using some of the funky features of the media player, you can create a playlist, in other words arrange a string of avi’s to play in a certain order, thus giving the illusion of a full length and non stop episode.

FreeYouTubeDownload version 2.2.1.1 has the ability to download a batch of youtube video’s, if you want to set a bunch of them going while you run a bath. To give you an idea of how big clips are, electronically: a ten minute cartoon clocks in at 55Mb and takes about 5 minutes on entry level ADSL to download. If you have a cap of 1Gb, you would have used up 5% of your cap to nab this clip. The size versus length of the clip does vary depending on the quality of the clip. Some National Geographic clips have a phenomenal quality, while other clips have very poor quality and are only just watchable on the little window that opens on the youtube website.

You could, technically, burn this AVI onto CD’s and DVD’s but unfortunately it won’t play on your conventional DVD player connected to your TV. I found this out the hard way. The clip needs to be converted, but fear not, a geek article in the near future will reveal how you can do just that. In the meantime, pull up the couch in front of your monitor and view your selection of AVI’s on your computer using a media player.

Other interesting sites you can try for videos: video.google.com, www.dailymotion.com or www.zeitgeistmovie.com . All three of these sites use videos which are Adobe Flash driven. Unfortunately, this means that they do not lend themselves to downloading with FreeYouTubeDownload.

The dvdvideosoft site also recommends that you stay updated with the latest version of the FreeYouTubeDownload program as YouTube change their video files hosting routine from time to time and the downloading might stop working until a fix is available.

If you just need to download one video and do not want to go to the trouble of installing any programs, try this site: http://www.dvdvideosoft.com/online-YouTube-video-download.php . Paste the URL in the window provided and follow the instructions listed. The downside to this method is that the downloaded video will be in flv format which is not yet common enough for every media player to play back. Windows Media Player for example does not understand flv format.

Wednesday, April 23, 2008

Signing out in Style


I often catch myself saying under my breath: “Don’t do as I do, do as I say.” Be that with my four year old son and the licking of knives or emphasising the importance of backup procedures on a clients computer.

I’m not always on top of things. In this way, I have put off figuring out how signatures in emails work, but now I’ve done my homework and never again will a recipient receive a trademarkless email from me.

It’s good business practice to add your name, business name and contact details at the bottom of each email you send out or reply to. What Microsoft Outlook Signatures can do for you is save you time typing.

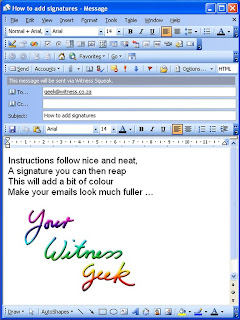
You can also fancify the signature by using a small picture. For example: you could write your name on a piece of paper, scan it into your computer and add that as your signature along with your contact details. This will give the email a personal touch in this digital age. Or you can insert your company logo. It makes the world of a difference.

Instructions below are for Microsoft Office Outlook 2003.

First, open Outlook and click on Tools, Options, Mail Format. The screen is divided into three sections. In the top section (Message Format), check that “Compose in this message format” is set to HTML. This will allow you to write emails in their full glory (including graphics). Also tick the “Use Microsoft Office Word 2003 to edit e-mail messages” option.

If, like me, you wear different hats in your daily life and have several email addresses, you can create a different signature for each email address. In the bottom part of the window (marked Signatures), pick your email of choice in the “select signatures for account” window. “Signature for new messages” and “Signature for replies and forwards” will still be blank, but click on the “Signature” button underneath that.

Create a new signature and give it a name. Once you click on “Next”, you now have the option of creating a text-only type of signature. In the Windows for Signature text you could now fill in: “Andrea Arbuckle, Witness Geek, Geeksville” or something similar. Click on Finish, and then on OK. Now click on the down arrows next to “Signature for new messages” and “Signature for replies and forwards” and choose your signature that you’ve just created and then click on OK. That signature will now be added to any new email you write using that email account as well as any email that you reply to, using that email account.

That is your simplest form of signature. You can repeat this process for each of your accounts (your different email addresses, i.e. work and private) and each one will have its unique signature.

vCards
If we step back through the procedure but stop before we finish designing the signature, we could add a vCard. This will attach a business card to your emails that users can open and add to their address book. If you wanted people to have your correct company name, telephone contacts and web addresses, without them having to add this themselves painstakingly, you could create yourself in your own Contacts, fill in all the details and then attach yourself as a vCard in the signature. Your email recipients could then open this vCard and add it to their address book. In the future, if they want to get hold of you, they don’t need to look for an old email of yours, they need only look you up in their Contacts.

So, just because this is the day and age of viruses, the attachment that would be sent out would look something like: AndreaArbuckle.vcf and it would be about 200kb in size, which is a bit hefty to send with every single email. It would be wiser to send this out once only for each client.

Adding logos or handwritten names
If you want to add your company logo to your signature, you can create a combination of written text and picture by using the “Advanced Edit”. It’s a button on the right at the stage where you can type your signature. When you click here, it will warn you that it is launching an external editor, mostly Microsoft Word. You are now able to beautify you simple text by any means you want to. For example if you want to insert your company logo, click on Insert, Picture, From File and find your logo and insert. Remember that you do not want to insert a huge photograph or a high resolution graphic that will be too big electronically and hold up all your emails going in and out. As a rule of thumb don’t use graphics larger than 50kb. Also, this is a good time to learn what the dog with the lines through it in the Picture toolbar does: Your graphic might push the text awkwardly to one side or another. Click once on the graphic and choose the dog (text wrapping) icon. Choose “Tight” or “Square” to allow text to wrap itself like a blanket around the graphic.
Another important matter to remember here is that a normal “Enter” to separate lines will result in double spacing later on. Instead of a normal Enter, use Shift+Enter to create a HTML friendly line break.
Once your signature is looking perfect, close the editor (use the X in the top right corner if you like) and Save when asked. Note how you’ve created an *.html not a *.doc document.

Don’t worry if Outlook squeals about not being able to find your document at this point, it actually does find it once you click OK. (Windows Bug, me thinks).
Proceed as before (i.e. add it to your “Signature for new messages” and “Signature for replies and forwards”) and now, when you start a new email, you will have a wonderful logo to go with it.

If you want to personalise your email with your signed name (maybe don’t use your official signature to prevent fraud), write it on a piece of paper and scan it in on a scanner. Use an image manipulation program such as FastStone to crop it and resize it (electronically) nicely so that it isn’t huge and proceed as if it was a logo.

If you have one email address only, but you have need to use several different signatures, depending on the email, here is how you insert a signature from a host of signatures you have designed in the past: Once you’ve got your new email open and you’ve clicked in the main body of the email, you can click on Tools, Options, General. Here, choose the E-mail Options and click on the E-Mail signature that you want to insert. Now you have to actually copy the signature presented in the middle window by clicking in it, and selecting all the text, Ctrl+C to copy. Then click OK, and click Cancel to exit the Tools menu. Now click Ctrl+V to paste the signature into your email. This is not the slickest way I can think of, but there you go, it does work. I would have the one signature that is used the most set as the default so one doesn’t have to go through this rigmarole every time.

Note that there is a signature feature in Outlook Express, but it works slightly differently.

Wednesday, April 9, 2008

Geek says Hello to Peter!


With a nebulous name such as “Hello Peter” and a byline of “your customer crusaders”, this website doesn’t belong to MTN nor to Woolworths, but if you’ve received good or bad service by either of these companies anywhere in South Africa (or further afield), you can post it here.

www.hellopeter.com is the world’s largest customer service website, founded by Peter Cheales. It allows people to leave comments about any company for free. Not for free, companies can sign up to respond, thus enabling them to set the record straight, or take corrective action against each complaint/service listed against them by a customer.

The aim of the site is to increase service levels of suppliers by allowing users to post company-specific, constructive criticism as well as compliments. A yellow smiley indicates a compliment, a purple sad face is a complaint. The site is moderated and hurtful or racial statements are deleted immediately. Companies are initially made aware of comments left on the site by users who forward a comment to a company. Companies can then become a “company who responds”, by signing up and paying an annual subscription fee of R315. An Annual Response Fee is charged over and above this, depending on how many comments are made about them.

I spoke to Peter Cheales, founder of HelloPeter.com last week, and posed these questions:

WITNESS: Hello Peter, you are based in Johannesburg. What is your main line of business?
CHEALES: I’m a motivational speaker and have been in the motivational circuit for 15 years. In this industry, every speaker has his or her particular hook, mine is customer service.

WITNESS: How did the name HelloPeter come about? Are you an agony uncle?
CHEALES: I used to have people come to me after a talk complaining of rude experiences they had with suppliers. This was around about the year 2000 and the dot com crash posed challenging times for any Internet related business. I had this idea of a forum on the Internet, though, and even without any programming background I intended starting a customer service site, but all the obvious names were already taken, and all that was left was hellopeter.

WITNESS: Is HelloPeter a totally new concept or just a first for South Africa?
CHEALES: It is a totally new concept, globally, starting in 2000. Since then copycat sites have evolved which try to replicate my model, but my site is the biggest customer service site in the world.

WITNESS: Please give us some statistics about HelloPeter.
CHEALES: To show you some statistics, visit www.alexa.com, a Web Information Company and check our traffic graph or compare it to various sites.

Also: HelloPeter currently has 518 registered companies who respond and 379 companies who don’t. In the last 12 months alone, there have been 13023 happy comments and 55311 unhappy comments made by users.

WITNESS: Why have a web based interface which limits your reach to computer literate people with Internet access only? Why not just create a call centre?
CHEALES: The point of the medium is to expose truth and opinion. A call centre cannot expose opinion or its stories. I have got 92 000 journalists all writing for me at the moment, they are the customers! They want to expose their opinions, as is evidenced in the explosion of blogs on the Internet. HelloPeter is a glorified blog which was invented before the word blog came into being. It is the web log fielding tens of thousands of customer experiences. Generally customers of the big suppliers across industries (such as banks or cell phone companies) who use HelloPeter are all employed. 98.7% of all comments on HelloPeter are made during working hours, so it is a focused solution.

WITNESS: My sister uses HelloPeter when she needs a response from MTN. She gets answers from MTN via HelloPeter. Doesn’t that almost make MTN’s internal call centre obsolete? What should MTN do in your opinion?
CHEALES: HelloPeter is an add-on facility to suppliers’ existing response mechanism. HelloPeter is not aimed at removing existing corporate service mechanisms. MTN, as a matter of fact, has three dedicated people working specifically on HelloPeter, pretty much all the time and they are excellent, taking their function very seriously. HelloPeter therefore serves as education facility as well for the suppliers, whereby a response to one customer can often educate and inform all the other customers who read that response.

WITNESS: Speaking of companies, they are clearly divided into those who respond and those who don’t. If a new company is complained against, but they have never heard of HelloPeter, does your HelloPeter team contact that company?
CHEALES: No, we don’t ever contact anybody. That company will hear about the comment within a remarkably short period of time. We encourage users to forward comments, i.e. email a comment to a friend. They might then forward it to a company. This “email to a friend” feature currently sees 4000 emails being sent daily. We also wait until a company has received five comments with no response before that company becomes listed as a “company who doesn’t respond”.

WITNESS: Do companies, even those who do respond, ever get aggressive toward what HelloPeter is doing? What do you tell them? Have you had big companies try to bully you to back down? Or calm the website complaints process down?
CHEALES: This debate has been raging for years. First of all there are checks and balances built into the website. One of them is that anybody can report abuse. When you’re dealing with services issues, everybody becomes an expert on customer services. Also, what might be great services to you might be shocking service to me. It’s pure opinion – can one denigrate someone else’s opinion? If someone voices an opinion we have no problem with that. If, however, abuse enters the comment by means of swearing, personal vendettas or racial abuse, we at HelloPeter delete the comment. We are also able to pick up if a company disguises itself as a user and posts many positive comments about itself.

WITNESS: What is the main reason “companies don’t respond” in your opinion?
CHEALES: It depends on the company. If it’s a little company, there is no need to sign up, if it’s a medium sized business, you often get prevailing arrogance with the attitude: “We have our own website and call centre or customer service department.” Large companies like SAA or Telkom don’t actually have a clue who would monitor this.[sic]

WITNESS: If I was a customer with a complaint, in your opinion what should I do first? Call the company’s call centre to see if I can get some joy or go straight to HelloPeter?
CHEALES: I ran a survey asking exactly this question a year ago: It came back exactly 50/50. More and more people are using HelloPeter as first call rather than as a last resort.

HelloPeter has its controversy. It is listed as a company who responds and has currently got 469 happy comments versus 331 unhappy ones. Phew, why so many bads? I dug around HelloPeter looking for an active company who responds with ties to Pietermaritzburg and stumbled upon Hirsch’s Homestore. I contacted their CEO, Allan Hirsch and asked his opinion about HelloPeter.

WITNESS: Why did you join HelloPeter?
HIRSCH: I joined because I had a complaint from a customer. I tried to reply to the complaint only to be advised that to do so you have to pay HelloPeter to reply. This I felt was unfair and a bit of blackmailing, so I chose to ignore it. A little while later I went to one of Peter Cheales’ talks and decided to have the opportunity to reply.

WITNESS: What did you gain by signing up as a company who responds?
HIRSCH: I obviously gained a lot of frustration because many times it has been an abusive relationship. People write abusive things about companies without giving us [companies] the opportunity to rectify the problem. In many cases we are not even given the chance to rectify the problem. I don’t think this is a fair system and I would like the opportunity to qualify people if they have a complaint, certainly allow them to air it, but in many cases it is not so.

WITNESS: Is HelloPeter useful in your opinion?
HIRSCH: No, I don’t think it is. I honestly feel that HelloPeter is an abusive system and not fair. It is a way for him [Peter Cheales] to make money and for people to gripe and complain. In many cases there are genuine and serious complaints and in equally as many cases, it’s just a platform where people think they can air their views and try to abuse companies.

Wednesday, March 26, 2008

Mixed potpourri of geek snippets


Office 2007 file format converter
So I don’t think much of Windows Vista. It is said that in 2007, Vista was only shipped with 39% of all new PC’s because nobody wanted it. I also heard that in June this year, XP will no longer be available to buy, so anybody needing to stock up on licenses should do so soon, if they prefer to steer clear of Vista. Although you don’t need Vista to run Microsoft Office 2007; it can be run on XP, not too many people are using Office 2007 yet either. It looks radically different from the conventional Microsoft Office 2003 so many believe that if it aint broken, don’t try to fix it by migrating to 2007. The main reason for the reluctance to migrate is the file format change, though. MS Word 2003 and prior versions created documents with an extension “.doc” and MS Word 2007 has “.docx”, the old Excel uses “.xls” vs. Excel 2007 “.xlsx” and old PowerPoint uses “.ppt” while 2007 has “.pptx”.

Users of previous versions of Office can’t read documents created in new versions and the only solution is for 2007 users to back-save before distributing to their older version contacts? Not quite! Microsoft has come out with a file format converter that allows Office 2003 to be spruced up to open 2007 documents. This converter is free to download from www.microsoft.com. Microsoft say you must ensure your system (if an Office XP or 2003 user) is up to date by installing all High-Priority / required updates on http://update.microsoft.com beforehand. Then, in the search window on www.microsoft.com type FileFormatConverters.exe and download this hefty 27Mb executable. Double-click to install and that should take care of opening documents from 2007 in 2003.

Avast outstrips AVG
Next update is on the Antivirus front: AVG used to be the most popular free antivirus program out, but in recent times a new name has made itself felt and people, including myself, have started to uninstall AVG and migrate to Avast. Avast is available free for home users on www.avast.com . I have come across a couple viruses/trojans that AVG did not pick up but Avast did. If you suspect your system is compromised, the thing to do is download avast ( 19Mb), load it, download the latest virus database as per avast menu, restart your computer in safe mode and virus check your system.

Safe Mode
Chances of adware/spyware/viruses loading in Safe Mode are minimal. To boot into Safe Mode in Windows XP, shut down the computer totally (as in power off – keep power off for 30 seconds). Turn the computer on and start tapping the F8 key every second as the white (pre-windows) writing starts coming up on the screen. You will drop into the Windows Advanced Options Menu. Using the arrow keys on your keyboard (the mouse won’t work yet), choose Start Windows in Safe Mode. Virus check your system, then reboot normally to get back into conventional Windows.

Synch it with Google
An interesting addition happened in Google Calendar not long ago. The Google team came up with “Sync with Microsoft Outlook calendar”. If you use the Google Calendar to its fullest, inclusive of free reminder sms’s of upcoming events, but you also want the features offered by Microsoft Outlook, syncing Google Calendar to Outlook (or Outlook with Google – or both) is now possible and easily set up. All you need to do is surf to www.google.com/calendar, click on the new red link at the top that leads to the Sync feature and download, as per instructions, the executable GoogleCalendarSyncInstaller.exe . Once downloaded, double click on it to install it and decide if you want a 2-way sync, or a one way from or to Google Calendar. You are also able to set the interval between each synchronisation. Sweet, this can now easily be incorporated into your existing Microsoft Outlook Calendar, or the one used at work. It only syncs your main calendar for now, which is a downside if you use several calendars in Google.

Load Shedding Info
Focusing on the wonderful world of load shedding, forewarned is better than being caught off guard. The internet has a number of websites dedicated to the power issue. The obviously important one is when can we expect a load shed? Ideally keep an eye on www.eskom.co.za/live and watch that dial they show on TV. If it goes into brown – trouble. Another useful site which quotes more links is www.poweringsouthafrica.co.za and is especially useful to find out what can be done to help Eskom out of their quandary and how to save electricity.

And if you want to take power saving to new heights, use www.blackle.com instead of www.google.com which swaps the white background with a black one, thus saving energy. Or does it? The jury really is out on this one, but hey, blackle sure makes for a change.

Don’t blow your lid
If you need to be prepared, there is a company in Cape Town that specialises in UPS’s (Uninterrupted Power Supply) as electronic equipment not shut off in time can take strain and blow. If you need a solution, maybe www.powerbackups.co.za have it?

The Witness Geek, when not in panic mode of one form or another, answers emails on geek@witness.co.za or you can visit her blog on www.witnessgeek.blogspot.com .

Tuesday, March 11, 2008

OF FAXING AND OTHER INTERESTING PASTIMES

First off, I would like to thank Ronan Duff for piping the accidentally misspelt URL of Maritzburgs' Blog back to our www.pmbblog.co.za . So drop by and set yourself up on our Maritzburg blog spot.

But if blogging isn’t your scene, maybe faxing is? Read on as I’m about to demystify how to receive and send faxes from your computer.

Before you sign up for a quick and free fax number via some service provider advertising this service, consider if you will need to send faxes, too, or if being able to receive faxes is good enough. Choosing your fax service provider depends on this decision as not all service providers also accommodate the sending of faxes from your PC. Here’s the lowdown:

RECEIVING IS EASY
It is easy to set yourself up with a quick fax number to which you can receive faxes. Incoming faxes will come through on your email and it is a free service which many service providers offer, including Postnet. Surf to www.postnet.co.za and click on their Fax2Email icon and choose a Postnet outlet near you. Then fill in your details, wait for the activation email to come through to you and click on the activation link. You will now already have an 086 fax number allocated to you, but Postnet still needs to set the 086 number up to pipe any incoming faxes to your email provided. They say it takes about 2 hours before it’s activated. When a fax comes through to you, you will see it as an email in your Inbox with either a tiff file (Tagged Image File Format) or an Adobe Acrobat Reader .pdf attachment.

SENDING REQUIRES DECISIONS
If you need to send faxes from the comfort of your computer, here are further options:

If you still have a dial-up modem, and Windows XP or younger, you can send faxes from your computer using “Windows Faxing”, a facility which Windows provides, but which can be tricky to set up.

It involves adding the Windows Component ‘Fax Services’ in the Control Panel. The Windows Component Wizard should be able to set up the rest and you will be able to send a fax by pretending to “print” and instead of using a physical printer, use the Fax option. Read more about this on the Microsoft website by searching for “Faxing” when you’re at www.microsoft.com .

If you have moved onto ADSL, please note that an ADSL router cannot be used for faxing as it is a router, not a modem. I asked Des Ramsay of SAI for a technical explanation: “ADSL modems do not dial into POP's like your old dial up modem does. This time an ADSL modem works like an ADSL router, but connects to a DSLAM port. You can't put a telephone number into a ADSL modem, if that makes sense.” Clear as mud to me, but what I will remember is that if I had an old dial-up modem still connected to my computer, I could plug it into the phone line and use it to fax, even while using the ADSL router to surf the net and get my email.

However, remember that sending faxes this way incurs a cost as it is essentially a phone call you are making.

But, at a reasonable price, you could circumvent this roundabout way of faxing and faffing by asking your Internet Service Provider for a solution.

I asked SAI and they offer VAX Services. SAI, like Postnet, are able to supply you with a free 086 fax number which allows you to receive faxes. The good news is that even if you are not an SAI client, you can get your free fax number from them.

Should you require to send faxes, you can then ask SAI to install VAX Services for you, which enables you to use your email to send faxes. These sent faxes incur a cost, and a monthly premium of R35 covers this service. If faxes sent for the month exceed R35, the cost jumps to R70. Speak to them on 0861 33 22 11 or email them at freevax@sai.co.za.

Once Vax Service is installed, a fax would be sent from your email program with the recipient address showing the fax number like this: 27865183606@vax.co.za

USE IT OR LOOSE IT
Unused 086 fax numbers are recycled after three to six months, so if you rush out to get one just for fun, use it or loose it, dears. They are also not transferable between service providers. This is the geek faxing out the signal. Roger Roger.

Check out the Witness Geek blogspot on www.witnessgeek.blogspot.com or visit www.pmbblog.co.za

Sunday, March 2, 2008

Social Networking


Wayne Janneker is a passionate twenty five year old Network Systems Engineer. His involvements range from the Pietermaritzburg Linux Enthusiasts Group to the Lincoln Meade Neighbourhood Watch. His day job includes programming and fixing peoples problems and I should know, he’s helped me on a number of occasions. We started chatting about trends in social networking, especially how the internet has redefined how people connect and find like-minded communities. Janneker has been researching this, and I went to quiz him in “real” life at his office.

When he started looking into social networking, he first asked himself how the average local Internet user had adapted to the Internet as a whole and discovered that the FUD theory is still very much alive and kicking. FUD standing for “Fear, Uncertainty and Doubt”. People are still scared to give out credit card details online. Janneker found random people he chatted to “horribly shocked” when asked if they would book a flight online. Most people had heard urban legends that they would get to the airport only to find they had been “suckered” into divulging their credit card details, that there was no booking or seat on the airoplane for them and that their details had been leaked to spam engines or even the Russian Mafia for identity theft. Read more on the truth behind urban legends at www.snopes.com. Janneker explains that one needs to be savvy and understand that sites like the online SARS, Discovery Health, Mango Airlines and banks, ranking amongst legitimate sites, may require more personal information and advises users to look out for the golden keypad on a secured website.

Controversially, Janneker says that on social networking sites such as Facebook, users often gladly reveal email addresses, telephone numbers and photos of themselves publicly and thinks that this is where stalkers could have a field day. He draws the line at handing out email addresses on social websites.

“I must state social networking, even from the begin of time, can only be as safe as what you disclose!” philosophizes Janneker.

After these so-so findings, Janneker decided to dig deeper into the aspect of social networking and came to the conclusion that social networking is a culture, not a “thing”. It existed well before the Internet, computers and even telephones and today’s technology has just opened quicker and easier avenues.

“Social networking is really you and a group of people coming together on a common ground and communicating on a mutual level that is fun and easy. The internet just makes it possible for you to communicate with others on a global level.” says Janneker.

Today’s methods of sharing these common interests include blogs (text based journal entries posted on the Internet), podcasts (audio blogs) and vlogs (video blogs).
Immediately one thinks of Facebook or MySpace, which is inherently a social networking site mainly used by the younger “folks”. Janneker discovered a strange phenomena: comparing friends he knows in the “real world” with their “cyber” persona, he noticed that their attitude and personality took on a new shape:

“I noticed, for example, shy friends I knew from school, who are now on facebook looking cool and hip. On a human level they are more timid, but on a cyber level they’ve upped their personality a good deal. They now have a “second life” online.”

“If you didn’t know me in real life, I, Wayne, could portray a new image. It’s almost like a second chance to better their image, nobody knows the true you and you can live what you are missing.”

This led Janneker to find out more on attitude change. He found a survey on www.eweek.com which states that conventional internet dating sites used to find poor responses to posts: around about a 5% match. Then a new dating site offered a “virtual makeover” which reports a 99% success rate. What did they do? They “spruced up” members profiles to make them sound more desirable.

Janneker came away saying: “My personal view is that you have to be true about yourself online.”

These were almost alarming findings, so I asked Janneker to let me come away with something positive.

We discovered a common passion in Pietermaritzburg and its communities:

Janneker has taken his involvement in the Lincoln Meade Community watch online: www.lincolnmeade.co.za is an active and up to date website reporting on issues surrounding latest arrests, incident and information boards. Janneker has linked up with other community watches in South Africa who share tips and even phone to help with issues.

Computer forums are inherently helpful and none more so than PLEG (Pietermaritzburg Linux Enthusiast Group), who have been the trading post for taking unwanted computers off a companies’ hands and redistributing them to the needy communities such as schools, using open source software.

Women in Business and the Pietermaritzburg Chamber of Business use their active cyber community to network, giving it a business spin.

Using a blog to address business issues has been all but totally underestimated by South African businesses so far. Why not create a business blog such as a daily health tip aimed at South African women, or a weekly posting on financial tax tips pertaining especially to our local environment and let people add these to their RSS feeder to keep on top of their business game. This would be a lot more dynamic than a website.

If these blogs are helpful and handy, you are sure to get spin off business when readers have specific needs and hire your services.

Pietermaritzburg gets its own blog site
So during our interview, ever pro-active Janneker put on his thinking cap and went away to create a place where a network of Pietermaritzburg based interest groups could have a common blog or a link.

Not a new idea, but certainly one long overdue in our city, it is an open site to develop social networking in our city.

Surf to www.pmbblog.co.za and set yourself up. It is aimed at common interest local communities having one place to find each other.

“Blogs have a greater response, are read by more people more quickly than traditional ways of getting heard such as standing on a street corner.”

Tuesday, February 12, 2008

Google Earth – Now Bigger and Better


I decided long ago that buying even a relatively recent encyclopedia in printed form is a waste of money and space in this day and age. No sooner is it printed than it is out of date. Nothing brought this home to me more clearly than re-looking at Google Earth the other day. Now on version 4.2 (beta), Google Earth is an out-and-out wealth of knowledge, and hours of amazement were spent by the entire Arbuckle family. My husband had oodles of fun showing the world to our inquisitive four year old son, who, in return, could not wait to play the “Earth game” again the next day.

I was dumbfounded to learn that in Dubai, United Arab Emirates, there are several man-made structures easily visible from satellite and thus, Google Earth. There are Palm Jumeirah and Jebel Ali, artificial islands created in the shape of palm trees and loaded with luxurious houses, all with beachfront access. And then there is the “World” which is also a man made set of islands in the shape of the world. These islands are for sale and if I remember correctly, Angelina Jolie has already bought “Ethiopia”.

But let’s just straighten up some basics: Google Earth is a virtual globe program which shows satellite images and aerial photography in a surf-able program. The baseline resolution is now so good that I even saw my car parked outside our house. In Europe you are even able to see people milling around the London Tower (which you can now view in 3D, if that floats your boat, er, tower!).

The age of the images vary, they are not live! Most international urban images date from around 2004 (says Wikipedia) but the US images are more current.

Don’t even try to run Google Earth on a dinosaur of a computer, minimum recommendations are from 128M Ram upward with Windows XP or up. Broadband Internet access, unless you are of the most patient persuasion, is recommended. Start by surfing to http://earth.google.com and download Google Earth for free. It clocks in at 12.7Mb.

Once loaded, the Earth itself is navigated using the scroll wheel (the middle button) on the mouse to zoom and the left hand click drag to pan around.

The panels on the left side of the screen are divided into three categories: Search, Places and Layers. In Search, a simple “Pietermaritzburg” followed by the Enter key will take you home. In fact if you zoom in as far as you can, you’ll be parking on the intersection of Langalibablele and Boshoff street.

You are able to save your Favourite Places in the middle panel, “Places”. Start by finding a place of interest and adding a Placemark (a yellow tack) and dragging it over the exact spot. Then you need to name your Placemark and you are even able to give a more thorough description. Google Earth will supply you the Latitude and Longitude. Once you click OK, you can now right click over your Placemark and send directions to a friend. You may even be re-directed to Google Maps, which is a related applications whose main aim is to get people from one place to another and does not require you to download or install Google Earth, even if you can use co-ordinates obtained from it. It’s a happy mappy medium, if you will excuse the pun. I’m sure even your Garmin GPS can interface.

But if you click on “Add Content” next to the Place button, the fun really begins. Now you can add KML’s. (Keyhole Markup Language – the geographic answer to HTML). KML’s are tools for viewing and making interactive highly visual location-specific information. Phew, what a mouthful. Some KML’s I found: There’s one that shows you the World Energy Consumption, another a Rising Sea Level Animation. Nightlights of the World, City of London Timeline, the list goes on and on. Each creates a Layer that is superimposed on top of your view of Earth with the promised information. Some do have programming errors, be warned! These and other, preset layers, can be switched on and off so that you don’t have a total information overload.

The Layers section on the bottom left is basically a whole lot of options you can choose to see or hide at any one time. You may want to see roads or hide them. You could choose to see photos other people (or you) have uploaded around a certain landmark: they appear as blue dots before you click on them and they fall under the piggy back program called Panoramio. Pietermaritzburg has a total of three photos uploaded, what a scrawny shame. I tried to load more by subscribing to Panoramio, but I believe it takes a few weeks for them to reflect on Google Earth. Wikipedia entries are really interesting purple dots (and sometimes golf ball shapes) that pop up a Wikipedia (online free encyclopedia) entry when clicked upon. I even found a stunning panorama view of the Fish River Canyon (yes, I know that’s not in Maritzburg), which was uploaded using Gigapan and people are able to upload videos using YouTube.

But then Google looked up and in August 07 Google Sky was added “en toe het die poppe gaan dans”, as they say in Afrikaans. A little unremarkable black button in the toolbar and, Zzoooop, you suddenly switch your gaze to behold planets, stars and galaxies above. Now you are able to use the Layers to view constellations such as Orion or Leo, follow the planets’ paths and even learn about current sky events such as a brown dwarf eclipse in the Greater Orion Nebula currently taking place.

Google Earth is crammed so full of information and fun things to do, I would not be able to tell you about each feature even if I had all day. Go on, play!

Thursday, January 31, 2008

Contact Husbandry


The art of contacts husbandry is easily overlooked or put off for a rainy day, but in this day and age of electronic networking, that is very short sighted thinking. In the past I have harped on about “Thou shalt not steal thy co-recipients email addresses to use for spam” or “I shall hide mass email recipients in the BCC.” BCC being “Blind Carbon Copy”, not “Before Christ Computerised”, in case that was a jargon-swish.

The physical hoarding up business cards of people you need to keep in touch with is oh-so-passé because keeping this information at your fingertips involves sending an email or skyping them via your contacts list. Now a business card stuck in a fancy leather pouch just won’t do as you’d have to type the address into an email over and over again.

Right, dropped the bombshell now, have I? Contacts. Where on your computer is the best place to keep contact information, especially seeing as you want to duplicate as little as possible? It is a personal choice; you might be a whizz with databases and write one, or you might use an Internet based program such as Plaxo, or you possibly created an Excel spreadsheet or even gone out and bought a software package, but lets assume you’ve done none of the above. Let’s also assume you use Microsoft Outlook for today’s article, not Outlook Express, for your emailing needs. My suggestion is that you take a good hard look at the full functionality of the “Contacts” within Microsoft Outlook. You will be forgiven if you have only used it as an email address book, but it is so much more.

First, find it by looking for a longish “Contacts” button on the bottom left of your Microsoft Outlook screen. Change to Contacts from Mail (the default) and straight away you will see your current contacts, if any, in Address card view. Double clicking on an existing contact will show its properties, and if you have quite a few contacts, you may search for a specific contact by typing part of their name in the “Look For” window and clicking on “Find Now”. Alternatively you could use the “a to z” buttons on the right hand pane. If you have no contacts at all, adding a new contact is done by clicking on the “New Contact” icon on the task bar in the same place you would find the “New Message” button if you were in the Mail option. Essentially a “Contact” needs only two things to work: a Name (not even a surname) and an email address. After this you could “Save and Close” and start using it in your Mail program. But while you’re there, note how there are five tags to a contact, namely General, Details, Activities, Certificates and All Fields.

Browse these and start using the fields that are useful to you. The big blank area on the right in the General tag can be used for arb information that doesn’t fit elsewhere. Also, you could use a field such as “IM address” (which stands for Instant messaging) for the locally more popular Skype Address.
Note that fields which have a down arrow next to them allow for multiple entries, such as alternative email addresses.

Another tip is that if you fill in the postal address (snail mail) carefully, you can use it to mail merge in MS Word or Excel by choosing the Outlook Contacts as the database.

The Categories to which your contact can be added as seen at the bottom of the General tag can be used to group your VIP business contacts together, or, creating your own Categories under “Add to Master Category List”, your golfing friends. You can even View by category and send all contacts belonging to a set category a mass message by clicking on “View by Category”, Actions, “New Message to Contacts”. This will send a message to all Contacts who have that category in common.

That would almost be like creating a distribution list, which is done by clicking on New, Distribution List, naming the list (for example Family) and selecting members to belong to this list. A group email to this distribution list is now easy by choosing the List name.

If you want to save your typing but you wish to add a contact from an email you’ve received, proceed as follows: Return to the Mail button and double click on the email from your new contact. Hover over the email address and right click. Choose “Add to Outlook Contacts” and fill in any other bits as needed.

Back to the Contacts menu, selecting the “Activities” tag on a particular contact will invoke a search of all activities that have occurred between you and this contact, be it incoming or outgoing emails, meetings, tasks or even a birthday reminder if you’ve filled this information in. This is an ideal tracking help when your inbox overflows and you’re looking for that email that came in sometime last year. Note that Outlook wants to refresh this window every time you open the contact to make sure it’s missed nothing. Now remember your Excel hints and use column manipulation as in Excel and if you right click over the column headers you will be presented with more tools such as Sorting and adding more fields such as Sent or Received dates. Dead handy.

You can even be nice to your contacts (or business savy) and create a contact for yourself, filling in all information you wish your clients/friends to have. When you now write an email, attach your vCard by clicking on the down arrow next to the paperclip that attaches files and choosing Items instead. Now browse to your Contacts and select yourself. The recipient of the email can open and save this contact of yours (and overwrite any older information) and never be at a loss of how to get hold of you again. Perfect way to spread the word that your email address has changed, as long as people use Microsoft Outlook.

Keeping your contacts up to date and tidy and in one place is becoming one of the most important things anyone can do. The Contacts file can over time become your most valuable file, so backing it up is a must. A simple way of backing up is to open Contacts, click on File, “Import and Export”, “Export to a File”, Next, Microsoft Excel, Choose Contacts, Next, Choose a name and location for the exported file to go to, Next, Finish. This Excel file can be opened and used in Excel however you see fit, or you can use it to import your contacts to a different computer and even import it to Outlook Express, Microsoft Outlooks’ little brother.

It pays to spend some time with this contacts database and save yourself double work in the long run.

Wednesday, January 16, 2008

New ideas with photographs


Recently I took a few photos at a friends wedding and considered how I could make an imaginative present out of them. Even without an expensive photo manipulation program such as Adobe Photoshop, there is quite a bit of ingenuity and even mischief that one can get up to.

Have a look, if you, like me, own a Canon scanner, because it comes with quite a competent program called ArcSoft Photo Studio 5, and if you’ve ever bought a printer, you will know it has oodles of software that accompanies it. My favourite photoviewer and smalltime editer, I must add, still remains FastStone which can be downloaded for free from www.faststone.org.

My digital camera came with a free photo stitcher, that makes panorama photographs right up to 360°C. You tell the stitcher which photographs are meant to fit together and in what order and it makes an admirable attempt at putting a panorama of these photos together for you.

Imagine you’re standing at the Victoria Falls and, turning on your own axis, taking photos as you go. Then your computer stitcher recreates the view all round when you get home and you can enjoy it and even share it with people who have never been there. Of course, you have to remember to take neat, slightly overlapping photographs while out sightseeing. At weddings, it can be used to create a group shot of all the guests, which would otherwise never fit on one photograph.

A fellow blogger introduced me to a fun site to add a bit of class (or tongue in cheek) to photographs. The site allows you to create custom motivational posters with your own images and quotes. The outcome, which you can download, look exactly like those awe-inspiring posters you see in your managers office with quotes such as “Persistence” or “Aspirations” written underneath a stunning picture of a super trim rock climber hanging off a cliff by a fingernail. Now just close your eyes and imagine what quote you could put beneath one of your photographs and surf to www.mobuck.com to create your very own inspirational poster. For $1, you can download a high resolution image, hence the website’s name.

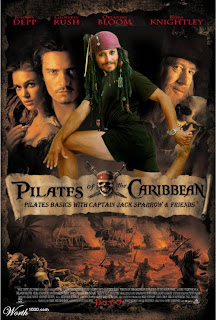
This made me curious and I browsed around for similar sights and found www.magmypic.com which specialises in fake magazine covers which allow you to insert a picture of your choice. With fake covers ranging from National Geographic to GQ, there is something for every occasion, be it to build a fun birthday card for a friend or to create an avatar (which, in digital speak, is the graphical representation of a user) for your facebook account. Just remember to choose an upright (portrait orientated) photograph of medium size.

So inspired was I that I carried on looking for unique ideas and found a website that had me totally bowled over. It must be one of the most creative websites out there and it’s called www.worth1000.com . It specialises in image manipulation. Every other day the site posts a contest topic, for example ‘Animal Geeks’, and invites registered users to post their manipulated and themed images. If they win, accolades follow. The best part is that the gallery of past contests is available for viewing and is mind blowing.

If you want to see a blow by blow account of how a very average model is made to look like a million bucks with nothing but makeup and photo manipulation, visit www.youtube.com and enter the words “Model Evolution with Make Up and Photoshop” into the search criteria. The video which comes up, will once and for all reveal to you how “airbrushed” our beauties of today have become and especially your teenage daughter will feel better for having seen this.

I hasten to add that my avatar (with me holding a computer chip in front of my left eye) which accompanies this article saw me in the accomplished hands of make up artist cum photographer Karen Edwards and is “only” colour manipulated. Needless to say, I was amazed at how a Geek like me can look so glamorous.

Inspired by what is possible with the right amount of imagination and dexterity, I became mischievous and decided to do some imitating on www.witness.co.za . If you are a frequent visitor to the site you will know that one is able to view past and present “front page Witness” pages, and it’s one of these I nabbed by right clicking over it and saying “Save Picture As” and squirrelling it away on my computer.

I opened my photo manipulation program. A free program called GIMP (GNU Image Manipulation Program) is available from www.gimp.org. GNU is a computer operating system composed entirely of free software, in case you were thinking wildebeest. GIMP is, as yet, inferior to Adobe Photoshop, I hasten to add.

Back to the mischief: I hacked and slashed the front page of the Witness into shape and superimposed my married friends into the front page photo and sneakily erased the headlines out to be replaced with a personal message.

All this done, I now wanted to make a sweet slide show with musical accompaniment which my friends would be able to watch on TV via the DVD player.

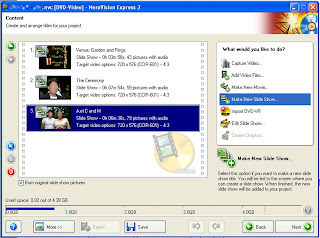
Enter Nero Vision Express. This is yet another program which is shipped free, this time with nearly every new CD/DVD burner sold. The latest version is Nero 7, but I will briefly explain how to use the more common Nero 6 version to create a slide show of all the pictures I had created using my ideas mentioned earlier.

If you open Nero (which is the software often used to burn data onto CD’s and DVD’s, there is an application called NeroVision Express in the top left part of the window. Inside here you can create your own project which can consist of a photographic slide show, or a movie or both together.

Initially, I was confused by what the difference between a project and a slide show is. Eventually I understood that a project can consist of several slide shows. The confusing part was that the program doesn’t ask you for a project name straight away, but wants the slide show name in the first step of the wizard. So I named the Project “The Wedding” and the first of 7 slide shows “The ceremony”.

To create a new Slide show, click in the top right window and “Create New Group”, then “Browse and Add to Project” the photographs you want. I recommend resizing very large photographs beforehand, so that Nero doesn’t struggle too much. I discovered that one slide show cannot contain more than 99 photos. A song or two can be added to play during the slide show. It’s fun to add “photo transition” effects or apply a random one so have the photos morph nicely from one to the next. This “Group” you’ve now created becomes a “slide show” when you click on ‘Next’. More slide shows can be added in the same way as before. Once all the photos have been added, you are wizarded onto the DVD menu creator, which allows you to use a template to make a neat DVD menu which will eventually respond to your remote control input. You then get ushered to burn the creation after which you can view it on your DVD player connected to the TV.

What a lovely gift. Visit www.tucows.co.za or www.download.com if you want to search for other free or shareware software that do similar things.

This story and other articles can be viewed on the geeks weblog at http://witnessgeek.blogspot.com/ and you can email her on geek@witness.co.za .

Thursday, January 3, 2008

Forms for Word


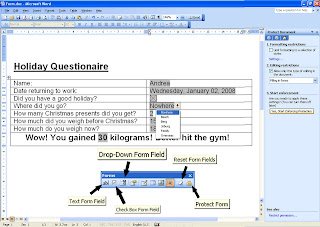
So you’re back with your nose at the grindstone, either already or soon, are you? Just to amuse your co-workers, why not send them a quick holiday questionnaire?

Microsoft Word has a feature called forms. Forms can be used to neatly collect data from many users (who also use MS Word) in form fields, check or drop down boxes provided. The entire look of the form and the form fields are created by you. So your imagination is the limit, and here is how it works:

First, switch on the Form toolbar by clicking on View, Toolbars, Forms. It’s a very uncomplicated toolbar. The first three icons on the left are the ones that make the fields.

Think of it this way: A form field is the placeholder where the person filling in the form puts their answers. So if you want them to put their name, create a form field (the first icon, which has the letters ab in them) in the exact place where they should put their name. Obviously you have to write what it is they need to fill in. That would be normal text and in my example I’ve simplified the overview by making my questionnaire in the form of a table. It’s easier on the eyes.

Choose “Form Field Shading” (the ‘a’ with the stripes around) so that any form field shows up in grey.

Once you’ve got a form field inserted, you can double click on it to see all the different options. A normal text form field, for example, can be set to a specific type, namely text, numbers or dates. Special form field options include automatically inserting the current date or doing simple calculations based on previously entered information. You can add help texts for users by clicking on the “Add help text” button at the bottom of the properties box. The help text can either appear in the Status bar (the grey line which shows the number of pages and lines and columns at the bottom of the screen) or the help can show up when the user presses the Help Key (F1), or you can play it safe and add it to both.

Advanced text form field options - calculations
Also in the properties you can rename the form field by changing the name in the ‘bookmark’. If you want to do simple calculations based on other fields entered by the user, you use the name given in the bookmark. For example I created a simple subtraction formula by asking before and after Christmas gluttony weights. I then created a form field calculation which works out the gained weight and tells you to hit the gym. In that calculation field, I changed the type to Calculation and my formula reads: =After-Before .

Check please
The second icon on the form toolbar inserts a simple check box which can be ticked or unticked.

Drop Down Form Field
If you want to have a multiple choice type question, you can use the third icon (Drop Down Form Field) and once you’ve double clicked on it, you can add your own answers. You type the options one by one into the ‘Drop Down Item’ field and click on ‘Add’. The top item will show as default. You can move your inserted items up or down the list.

Done? Save the form. (See step three for optional template creation).

Step one: LOCK – not optional
The only really tricky part about forms is to set them up ready for use.
Once you’ve finished the form and you want to use it, you must lock it. Do this by clicking on the padlock icon on the form toolbar (the last icon). This will allow you (and the users) to only type in the form fields. Hide the form toolbar. Now save it again. Users can now open the form, fill it in and either save it again or print it or email it. It looks neat, can be easily viewed and even scanned.

Step two: PROTECT – optional
If you want absolutely nobody to be able to tamper with your form, don’t only lock the form, but protect it. Do this by clicking on Tools, Protect Document and note how the Task Pane on the right hand side now has three steps waiting for you. Tick Step 2 and change the drop down list to ‘Filling in Forms’. Then, in step 3, click on ‘Yes, Start Enforcing Protection’. You will be asked for a password.
For heavens sake, don’t loose this password if this is an important form. I’ve never found a way to crack back into a word document once it has been password protected!

Step three: TEMPLATE – optional
If you want a squeaky clean entry form every time a user opens the form, but you want to keep a saved copy of every user, the best way to make sure your form isn’t overwritten is by turning it into a template. To do this, click on File, Save As and choose Word Template in the ‘Save as Type’. This will create a template much like the fax templates available. Tip: Don’t change the location of the template from the one the computer recommends, else it can’t find it. Once saved, close the template, click on File, New and see your template appear in the General Templates place. Unfortunately this will only work on the computer you’re working on, not anyone else’s. You have to copy it to each PC that needs it.

Serious uses of forms:
• Capture information about people applying for one of your services, i.e., school application, or subjects to be taken at a learning institute.

• Basic order/quotation forms which do simple calculations based on entered information.

• Internal Company questionnaires required by HR departments.

• Marketing surveys and other type of polls.

Note: Microsoft Word Forms do have their drawbacks. They are not real data capturing tools as there is no database attached to the form that just adds each entry to it as it is filled it. It only simplifies and neatifies the filling in process. Adding this information to a database still has to be done afterwards by a data capturer.

Look up past, present and future articles on the Witness geek’s blog at http://witnessgeek.blogspot.com/ or check on http://blogs.24.com/ under the user KeenEye.