Tuesday, February 12, 2008

Google Earth – Now Bigger and Better


I decided long ago that buying even a relatively recent encyclopedia in printed form is a waste of money and space in this day and age. No sooner is it printed than it is out of date. Nothing brought this home to me more clearly than re-looking at Google Earth the other day. Now on version 4.2 (beta), Google Earth is an out-and-out wealth of knowledge, and hours of amazement were spent by the entire Arbuckle family. My husband had oodles of fun showing the world to our inquisitive four year old son, who, in return, could not wait to play the “Earth game” again the next day.

I was dumbfounded to learn that in Dubai, United Arab Emirates, there are several man-made structures easily visible from satellite and thus, Google Earth. There are Palm Jumeirah and Jebel Ali, artificial islands created in the shape of palm trees and loaded with luxurious houses, all with beachfront access. And then there is the “World” which is also a man made set of islands in the shape of the world. These islands are for sale and if I remember correctly, Angelina Jolie has already bought “Ethiopia”.

But let’s just straighten up some basics: Google Earth is a virtual globe program which shows satellite images and aerial photography in a surf-able program. The baseline resolution is now so good that I even saw my car parked outside our house. In Europe you are even able to see people milling around the London Tower (which you can now view in 3D, if that floats your boat, er, tower!).

The age of the images vary, they are not live! Most international urban images date from around 2004 (says Wikipedia) but the US images are more current.

Don’t even try to run Google Earth on a dinosaur of a computer, minimum recommendations are from 128M Ram upward with Windows XP or up. Broadband Internet access, unless you are of the most patient persuasion, is recommended. Start by surfing to http://earth.google.com and download Google Earth for free. It clocks in at 12.7Mb.

Once loaded, the Earth itself is navigated using the scroll wheel (the middle button) on the mouse to zoom and the left hand click drag to pan around.

The panels on the left side of the screen are divided into three categories: Search, Places and Layers. In Search, a simple “Pietermaritzburg” followed by the Enter key will take you home. In fact if you zoom in as far as you can, you’ll be parking on the intersection of Langalibablele and Boshoff street.

You are able to save your Favourite Places in the middle panel, “Places”. Start by finding a place of interest and adding a Placemark (a yellow tack) and dragging it over the exact spot. Then you need to name your Placemark and you are even able to give a more thorough description. Google Earth will supply you the Latitude and Longitude. Once you click OK, you can now right click over your Placemark and send directions to a friend. You may even be re-directed to Google Maps, which is a related applications whose main aim is to get people from one place to another and does not require you to download or install Google Earth, even if you can use co-ordinates obtained from it. It’s a happy mappy medium, if you will excuse the pun. I’m sure even your Garmin GPS can interface.

But if you click on “Add Content” next to the Place button, the fun really begins. Now you can add KML’s. (Keyhole Markup Language – the geographic answer to HTML). KML’s are tools for viewing and making interactive highly visual location-specific information. Phew, what a mouthful. Some KML’s I found: There’s one that shows you the World Energy Consumption, another a Rising Sea Level Animation. Nightlights of the World, City of London Timeline, the list goes on and on. Each creates a Layer that is superimposed on top of your view of Earth with the promised information. Some do have programming errors, be warned! These and other, preset layers, can be switched on and off so that you don’t have a total information overload.

The Layers section on the bottom left is basically a whole lot of options you can choose to see or hide at any one time. You may want to see roads or hide them. You could choose to see photos other people (or you) have uploaded around a certain landmark: they appear as blue dots before you click on them and they fall under the piggy back program called Panoramio. Pietermaritzburg has a total of three photos uploaded, what a scrawny shame. I tried to load more by subscribing to Panoramio, but I believe it takes a few weeks for them to reflect on Google Earth. Wikipedia entries are really interesting purple dots (and sometimes golf ball shapes) that pop up a Wikipedia (online free encyclopedia) entry when clicked upon. I even found a stunning panorama view of the Fish River Canyon (yes, I know that’s not in Maritzburg), which was uploaded using Gigapan and people are able to upload videos using YouTube.

But then Google looked up and in August 07 Google Sky was added “en toe het die poppe gaan dans”, as they say in Afrikaans. A little unremarkable black button in the toolbar and, Zzoooop, you suddenly switch your gaze to behold planets, stars and galaxies above. Now you are able to use the Layers to view constellations such as Orion or Leo, follow the planets’ paths and even learn about current sky events such as a brown dwarf eclipse in the Greater Orion Nebula currently taking place.

Google Earth is crammed so full of information and fun things to do, I would not be able to tell you about each feature even if I had all day. Go on, play!
Thursday, January 31, 2008

Contact Husbandry


The art of contacts husbandry is easily overlooked or put off for a rainy day, but in this day and age of electronic networking, that is very short sighted thinking. In the past I have harped on about “Thou shalt not steal thy co-recipients email addresses to use for spam” or “I shall hide mass email recipients in the BCC.” BCC being “Blind Carbon Copy”, not “Before Christ Computerised”, in case that was a jargon-swish.

The physical hoarding up business cards of people you need to keep in touch with is oh-so-passé because keeping this information at your fingertips involves sending an email or skyping them via your contacts list. Now a business card stuck in a fancy leather pouch just won’t do as you’d have to type the address into an email over and over again.

Right, dropped the bombshell now, have I? Contacts. Where on your computer is the best place to keep contact information, especially seeing as you want to duplicate as little as possible? It is a personal choice; you might be a whizz with databases and write one, or you might use an Internet based program such as Plaxo, or you possibly created an Excel spreadsheet or even gone out and bought a software package, but lets assume you’ve done none of the above. Let’s also assume you use Microsoft Outlook for today’s article, not Outlook Express, for your emailing needs. My suggestion is that you take a good hard look at the full functionality of the “Contacts” within Microsoft Outlook. You will be forgiven if you have only used it as an email address book, but it is so much more.

First, find it by looking for a longish “Contacts” button on the bottom left of your Microsoft Outlook screen. Change to Contacts from Mail (the default) and straight away you will see your current contacts, if any, in Address card view. Double clicking on an existing contact will show its properties, and if you have quite a few contacts, you may search for a specific contact by typing part of their name in the “Look For” window and clicking on “Find Now”. Alternatively you could use the “a to z” buttons on the right hand pane. If you have no contacts at all, adding a new contact is done by clicking on the “New Contact” icon on the task bar in the same place you would find the “New Message” button if you were in the Mail option. Essentially a “Contact” needs only two things to work: a Name (not even a surname) and an email address. After this you could “Save and Close” and start using it in your Mail program. But while you’re there, note how there are five tags to a contact, namely General, Details, Activities, Certificates and All Fields.

Browse these and start using the fields that are useful to you. The big blank area on the right in the General tag can be used for arb information that doesn’t fit elsewhere. Also, you could use a field such as “IM address” (which stands for Instant messaging) for the locally more popular Skype Address.
Note that fields which have a down arrow next to them allow for multiple entries, such as alternative email addresses.

Another tip is that if you fill in the postal address (snail mail) carefully, you can use it to mail merge in MS Word or Excel by choosing the Outlook Contacts as the database.

The Categories to which your contact can be added as seen at the bottom of the General tag can be used to group your VIP business contacts together, or, creating your own Categories under “Add to Master Category List”, your golfing friends. You can even View by category and send all contacts belonging to a set category a mass message by clicking on “View by Category”, Actions, “New Message to Contacts”. This will send a message to all Contacts who have that category in common.

That would almost be like creating a distribution list, which is done by clicking on New, Distribution List, naming the list (for example Family) and selecting members to belong to this list. A group email to this distribution list is now easy by choosing the List name.

If you want to save your typing but you wish to add a contact from an email you’ve received, proceed as follows: Return to the Mail button and double click on the email from your new contact. Hover over the email address and right click. Choose “Add to Outlook Contacts” and fill in any other bits as needed.

Back to the Contacts menu, selecting the “Activities” tag on a particular contact will invoke a search of all activities that have occurred between you and this contact, be it incoming or outgoing emails, meetings, tasks or even a birthday reminder if you’ve filled this information in. This is an ideal tracking help when your inbox overflows and you’re looking for that email that came in sometime last year. Note that Outlook wants to refresh this window every time you open the contact to make sure it’s missed nothing. Now remember your Excel hints and use column manipulation as in Excel and if you right click over the column headers you will be presented with more tools such as Sorting and adding more fields such as Sent or Received dates. Dead handy.

You can even be nice to your contacts (or business savy) and create a contact for yourself, filling in all information you wish your clients/friends to have. When you now write an email, attach your vCard by clicking on the down arrow next to the paperclip that attaches files and choosing Items instead. Now browse to your Contacts and select yourself. The recipient of the email can open and save this contact of yours (and overwrite any older information) and never be at a loss of how to get hold of you again. Perfect way to spread the word that your email address has changed, as long as people use Microsoft Outlook.

Keeping your contacts up to date and tidy and in one place is becoming one of the most important things anyone can do. The Contacts file can over time become your most valuable file, so backing it up is a must. A simple way of backing up is to open Contacts, click on File, “Import and Export”, “Export to a File”, Next, Microsoft Excel, Choose Contacts, Next, Choose a name and location for the exported file to go to, Next, Finish. This Excel file can be opened and used in Excel however you see fit, or you can use it to import your contacts to a different computer and even import it to Outlook Express, Microsoft Outlooks’ little brother.

It pays to spend some time with this contacts database and save yourself double work in the long run.

Wednesday, January 16, 2008

New ideas with photographs


Recently I took a few photos at a friends wedding and considered how I could make an imaginative present out of them. Even without an expensive photo manipulation program such as Adobe Photoshop, there is quite a bit of ingenuity and even mischief that one can get up to.

Have a look, if you, like me, own a Canon scanner, because it comes with quite a competent program called ArcSoft Photo Studio 5, and if you’ve ever bought a printer, you will know it has oodles of software that accompanies it. My favourite photoviewer and smalltime editer, I must add, still remains FastStone which can be downloaded for free from www.faststone.org.

My digital camera came with a free photo stitcher, that makes panorama photographs right up to 360°C. You tell the stitcher which photographs are meant to fit together and in what order and it makes an admirable attempt at putting a panorama of these photos together for you.

Imagine you’re standing at the Victoria Falls and, turning on your own axis, taking photos as you go. Then your computer stitcher recreates the view all round when you get home and you can enjoy it and even share it with people who have never been there. Of course, you have to remember to take neat, slightly overlapping photographs while out sightseeing. At weddings, it can be used to create a group shot of all the guests, which would otherwise never fit on one photograph.

A fellow blogger introduced me to a fun site to add a bit of class (or tongue in cheek) to photographs. The site allows you to create custom motivational posters with your own images and quotes. The outcome, which you can download, look exactly like those awe-inspiring posters you see in your managers office with quotes such as “Persistence” or “Aspirations” written underneath a stunning picture of a super trim rock climber hanging off a cliff by a fingernail. Now just close your eyes and imagine what quote you could put beneath one of your photographs and surf to www.mobuck.com to create your very own inspirational poster. For $1, you can download a high resolution image, hence the website’s name.

This made me curious and I browsed around for similar sights and found www.magmypic.com which specialises in fake magazine covers which allow you to insert a picture of your choice. With fake covers ranging from National Geographic to GQ, there is something for every occasion, be it to build a fun birthday card for a friend or to create an avatar (which, in digital speak, is the graphical representation of a user) for your facebook account. Just remember to choose an upright (portrait orientated) photograph of medium size.

So inspired was I that I carried on looking for unique ideas and found a website that had me totally bowled over. It must be one of the most creative websites out there and it’s called www.worth1000.com . It specialises in image manipulation. Every other day the site posts a contest topic, for example ‘Animal Geeks’, and invites registered users to post their manipulated and themed images. If they win, accolades follow. The best part is that the gallery of past contests is available for viewing and is mind blowing.

If you want to see a blow by blow account of how a very average model is made to look like a million bucks with nothing but makeup and photo manipulation, visit www.youtube.com and enter the words “Model Evolution with Make Up and Photoshop” into the search criteria. The video which comes up, will once and for all reveal to you how “airbrushed” our beauties of today have become and especially your teenage daughter will feel better for having seen this.

I hasten to add that my avatar (with me holding a computer chip in front of my left eye) which accompanies this article saw me in the accomplished hands of make up artist cum photographer Karen Edwards and is “only” colour manipulated. Needless to say, I was amazed at how a Geek like me can look so glamorous.

Inspired by what is possible with the right amount of imagination and dexterity, I became mischievous and decided to do some imitating on www.witness.co.za . If you are a frequent visitor to the site you will know that one is able to view past and present “front page Witness” pages, and it’s one of these I nabbed by right clicking over it and saying “Save Picture As” and squirrelling it away on my computer.

I opened my photo manipulation program. A free program called GIMP (GNU Image Manipulation Program) is available from www.gimp.org. GNU is a computer operating system composed entirely of free software, in case you were thinking wildebeest. GIMP is, as yet, inferior to Adobe Photoshop, I hasten to add.

Back to the mischief: I hacked and slashed the front page of the Witness into shape and superimposed my married friends into the front page photo and sneakily erased the headlines out to be replaced with a personal message.

All this done, I now wanted to make a sweet slide show with musical accompaniment which my friends would be able to watch on TV via the DVD player.

Enter Nero Vision Express. This is yet another program which is shipped free, this time with nearly every new CD/DVD burner sold. The latest version is Nero 7, but I will briefly explain how to use the more common Nero 6 version to create a slide show of all the pictures I had created using my ideas mentioned earlier.

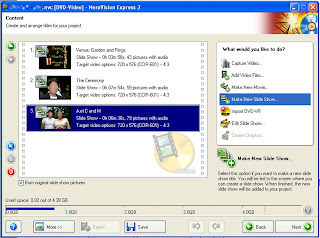
If you open Nero (which is the software often used to burn data onto CD’s and DVD’s, there is an application called NeroVision Express in the top left part of the window. Inside here you can create your own project which can consist of a photographic slide show, or a movie or both together.

Initially, I was confused by what the difference between a project and a slide show is. Eventually I understood that a project can consist of several slide shows. The confusing part was that the program doesn’t ask you for a project name straight away, but wants the slide show name in the first step of the wizard. So I named the Project “The Wedding” and the first of 7 slide shows “The ceremony”.

To create a new Slide show, click in the top right window and “Create New Group”, then “Browse and Add to Project” the photographs you want. I recommend resizing very large photographs beforehand, so that Nero doesn’t struggle too much. I discovered that one slide show cannot contain more than 99 photos. A song or two can be added to play during the slide show. It’s fun to add “photo transition” effects or apply a random one so have the photos morph nicely from one to the next. This “Group” you’ve now created becomes a “slide show” when you click on ‘Next’. More slide shows can be added in the same way as before. Once all the photos have been added, you are wizarded onto the DVD menu creator, which allows you to use a template to make a neat DVD menu which will eventually respond to your remote control input. You then get ushered to burn the creation after which you can view it on your DVD player connected to the TV.

What a lovely gift. Visit www.tucows.co.za or www.download.com if you want to search for other free or shareware software that do similar things.

This story and other articles can be viewed on the geeks weblog at http://witnessgeek.blogspot.com/ and you can email her on geek@witness.co.za .

Thursday, January 3, 2008

Forms for Word


So you’re back with your nose at the grindstone, either already or soon, are you? Just to amuse your co-workers, why not send them a quick holiday questionnaire?

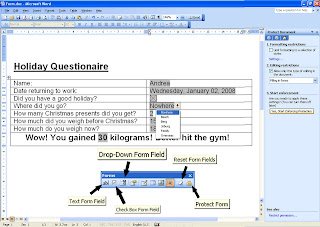
Microsoft Word has a feature called forms. Forms can be used to neatly collect data from many users (who also use MS Word) in form fields, check or drop down boxes provided. The entire look of the form and the form fields are created by you. So your imagination is the limit, and here is how it works:

First, switch on the Form toolbar by clicking on View, Toolbars, Forms. It’s a very uncomplicated toolbar. The first three icons on the left are the ones that make the fields.

Think of it this way: A form field is the placeholder where the person filling in the form puts their answers. So if you want them to put their name, create a form field (the first icon, which has the letters ab in them) in the exact place where they should put their name. Obviously you have to write what it is they need to fill in. That would be normal text and in my example I’ve simplified the overview by making my questionnaire in the form of a table. It’s easier on the eyes.

Choose “Form Field Shading” (the ‘a’ with the stripes around) so that any form field shows up in grey.

Once you’ve got a form field inserted, you can double click on it to see all the different options. A normal text form field, for example, can be set to a specific type, namely text, numbers or dates. Special form field options include automatically inserting the current date or doing simple calculations based on previously entered information. You can add help texts for users by clicking on the “Add help text” button at the bottom of the properties box. The help text can either appear in the Status bar (the grey line which shows the number of pages and lines and columns at the bottom of the screen) or the help can show up when the user presses the Help Key (F1), or you can play it safe and add it to both.

Advanced text form field options - calculations
Also in the properties you can rename the form field by changing the name in the ‘bookmark’. If you want to do simple calculations based on other fields entered by the user, you use the name given in the bookmark. For example I created a simple subtraction formula by asking before and after Christmas gluttony weights. I then created a form field calculation which works out the gained weight and tells you to hit the gym. In that calculation field, I changed the type to Calculation and my formula reads: =After-Before .

Check please
The second icon on the form toolbar inserts a simple check box which can be ticked or unticked.

Drop Down Form Field
If you want to have a multiple choice type question, you can use the third icon (Drop Down Form Field) and once you’ve double clicked on it, you can add your own answers. You type the options one by one into the ‘Drop Down Item’ field and click on ‘Add’. The top item will show as default. You can move your inserted items up or down the list.

Done? Save the form. (See step three for optional template creation).

Step one: LOCK – not optional
The only really tricky part about forms is to set them up ready for use.
Once you’ve finished the form and you want to use it, you must lock it. Do this by clicking on the padlock icon on the form toolbar (the last icon). This will allow you (and the users) to only type in the form fields. Hide the form toolbar. Now save it again. Users can now open the form, fill it in and either save it again or print it or email it. It looks neat, can be easily viewed and even scanned.

Step two: PROTECT – optional
If you want absolutely nobody to be able to tamper with your form, don’t only lock the form, but protect it. Do this by clicking on Tools, Protect Document and note how the Task Pane on the right hand side now has three steps waiting for you. Tick Step 2 and change the drop down list to ‘Filling in Forms’. Then, in step 3, click on ‘Yes, Start Enforcing Protection’. You will be asked for a password.
For heavens sake, don’t loose this password if this is an important form. I’ve never found a way to crack back into a word document once it has been password protected!

Step three: TEMPLATE – optional
If you want a squeaky clean entry form every time a user opens the form, but you want to keep a saved copy of every user, the best way to make sure your form isn’t overwritten is by turning it into a template. To do this, click on File, Save As and choose Word Template in the ‘Save as Type’. This will create a template much like the fax templates available. Tip: Don’t change the location of the template from the one the computer recommends, else it can’t find it. Once saved, close the template, click on File, New and see your template appear in the General Templates place. Unfortunately this will only work on the computer you’re working on, not anyone else’s. You have to copy it to each PC that needs it.

Serious uses of forms:
• Capture information about people applying for one of your services, i.e., school application, or subjects to be taken at a learning institute.

• Basic order/quotation forms which do simple calculations based on entered information.

• Internal Company questionnaires required by HR departments.

• Marketing surveys and other type of polls.

Note: Microsoft Word Forms do have their drawbacks. They are not real data capturing tools as there is no database attached to the form that just adds each entry to it as it is filled it. It only simplifies and neatifies the filling in process. Adding this information to a database still has to be done afterwards by a data capturer.

Look up past, present and future articles on the Witness geek’s blog at http://witnessgeek.blogspot.com/ or check on http://blogs.24.com/ under the user KeenEye.

Thursday, December 20, 2007

Make Moolah Online


Make Moolah Online

You might think the Witness geek has gone cheap and sleazy with today’s catch line of making money online, but I’ve just spend a whole bunch of hours researching sincere means of using a computer with an internet connection to make money.

Recently, I “found” (internet style) an old friend of mine with whom I used to work in England. She is now a full time blogger and using my newfound gadget of choice, the RSS feeder, I subscribed to her blog and discovered that she is able to make money from her blog by rating and writing about products. The more “hits” her “blogs that pay the bills” get, the better for her. One can also hire out space on blogs for adverts, and again the more popular blogs catch the biggest fish. Google AdSense seem to be leading the way in this so called contextual advertising program where adverts are blog topic related. That’s how come you often see South African “Sponsored Links” next to your Google search. Aha.

Witness Geek becomes a blogger

Like an eagle on its prey, I zoomed in and hereby loftily announce: I have a geek blog spot:
http://witnessgeek.blogspot.com which will be a working and ongoing project. That is to say, I will, over time, load all past geek articles for you to peruse. This may just be the answer to my search for a means to avail past Witness Geek articles to readers without charge.

Next I visited
www.bidorbuy.co.za a South African online Auctioneer. I’m still researching this and will be filling y’all in on this in detail in the New Year.

While sniffing around there, I came across a link to the South African E-Commerce Awards and when I had a peep on
www.jump.co.za/awards/2007, I realised I was in the company of greatness. Listed are the country’s top e-commerce companies in their particular category. So if you are not brave enough to face pull parking lots, endless cues and pushing ‘n shoving at the mall this festive season but you’ve some money to spare, here is a full list of each website voted top of its notch. Needless to say they are mooted “safe” to purchase online from.

Best Auction Website: Bid or Buy (
www.bidorbuy.co.za)
Best Automotive Website: Autostyle Motorsport (
www.autostyle.co.za)
Best Online Bookstore: Kalahari.net (
www.kalahari.net)
Best Clothing and Accessories Store: Rebelrock (
www.rebelrock.co.za)
Best Computer Store: Digital Planet (
www.digitalplanet.co.za)
Best Electronics Store: WebAntics Online (
www.webantics.co.za)
Best Flower and Gift Store: Netflorist (
www.netflorist.co.za)
Best Food and Wine Store: Woolworths (
www.woolworths.co.za)
Best Game Store: BT Games (
www.btgames.co.za)
Best Health and Beauty Store: Manology (
www.manology.co.za)
Best Home and Garden Store: YuppieChef (
www.yuppiechef.co.za)
Best Jewelry and Watches Store: Kalahari.net (
www.kalahari.net)
Best Kids and Baby Store: eDreams (
www.edreams.co.za)
Best Music and Movie Store: Musica (
www.musica.co.za)
Best Photographic Store: SA Camera (
www.sacamera.co.za)
Best Property Website: Private Property (
www.privateproperty.co.za)
Best Sports and Outdoor Store: Sportstuff (
www.sportstuff.co.za)
Best Travel Booking Website: SafariNow (
www.safarinow.com)
Best E-Commerce Enabler: iGroup (
www.igroup.co.za)
Best E-Commerce Website: Kalahari.net (
www.kalahari.net)

The criteria against which these websites were judged included: Website Design, Navigation, Usability and User-friendliness, Product Range and Price, Ability to contact someone from the website, Payment Options, Shipping Cost and Quality of Data.
But as if this revelation was not enough, I then went and had a look who judged these sites to be the best. Public voting accounted for 49% while a panel of judges had 51% of say. It was a mind blow to see just how far South Africans have taken the Internet (no wonder that the statistics show usage of the Internet in South Africa has grown exponentially). Each member on the expert panel has their own Internet ventures and snooping around their websites revealed a wealth of information, while I looked for more info on “how to make money on the internet”. The judges (and their own websites) consisted of: Andrea Mitchell -
www.34.co.za, Arthur Goldstuck - www.theworx.biz, Eve Dmochowska - www.ideabank.co.za, Gillian Meier - www.bluemagnet.co.za, Mike Stopforth - www.cerebra.co.za, Matthew Buckland- www.mg.co.za and Vinny Lingham - www.vinnylingham.com. When I grow up, I wanna be like them.

Seriously though, I noticed a couple of things: firstly there is such a thing as a business blog, in fact it’s really big! Secondly I noticed that I had totally underestimated the power of online marketing and e-commerce and its future. In other words, a company worth its salt needs to not only have a website, it needs to use the website ever increasingly to generate revenue. Big words for little mice, but for example, via Eve Dmochowska’s website I found a community for South African based entrepreneurs, developers, mentors and investors interested in the online space and it’s called
www.digitalgarage.co.za. Over and above that, Ms Dmochowska has not one but two RSS feed ready business blogs, separated by category.

Gillian Meier is a Search Engine Optimisation Analyst and Internet Marketing Professional, and I didn’t even know there was such a thing. It makes perfect sense to hire somebody like this if you want to raise your websites profile but have no idea how. I am so proud these two are South Africans as well as of the female persuasion. Now, if you want to learn the tricks of the trade yourself, Ms Meiers bluemagnet.co.za provides Web Intellect and Internet Marketing training. I couldn’t agree more to the concept of sharing knowledge.

So I’m thinking if there are matrics out there that have just been spewed onto the system without a prospective job in the New Year, I can envisage that entering this career path would be fertile ground as we are still in the growing stage.

To knock off todays article I found a funky website after my own heart, and it’s called Think Geek.
www.thinkgeek.com specialises in Geek T-Shirts, Geek Toys and other Apparel and I had a good laugh surfing through some of the products, maybe you will, too?

The Witness Geek wishes all her reader a Merry Christmas and a Happy New Year. You can email her on geek@witness.co.za

Tuesday, December 18, 2007

Geeky Christmas presents


Geeky Christmas Ideas

The festive season is upon us and you need to rack your brains for some new gift ideas. So do I and I’ve been keeping a geeky eye on what’s out there.

Idea number one: If you’ve grasped the broadband nettle, you or your kids may want to play a game or two. I’ve searched local stores for a dinosaur game for my four year old and come up blank. I turned to the Internet and found a cute game called Diego`s Dinosaur Adventure. My son loves it. It came from a site called
www.bigfishgames.com that prides itself on a new game per day. Their games are good and varied; there are kid’s games, puzzles, card games, word games, hidden treasure games and more. The games are either playable online or downloadable. You are expected to create an account after which you can try any game for free for an hour. Seeing as they have hundreds of games, that alone would keep you gaming for a while. Playing a game usually involves a chunky download procedure only recommended with broadband. I chose to buy a game and picked the Casual Pack option which allows me to download two games within two months for the price of approximately R70 per game and thus play as often as I like and for as long as I like. I paid by Credit Card and when I queried the BigFish Help desk if I can download the game on my home computer, I received a prompt and helpful return email, so the big fishies are on the ball. I recommend this site if you have cap left at the end of the month and you give the kids the go ahead to “play around”.

Idea number two: If you’ve splurged out and acquired an mp3 player, be it to enhance your jogging or hiking experience or if you are a married insomniac whose mind does not stop when your spouse expects lights out peace ‘n quiet, here’s an idea: Audio books. Having just returned from a visit to my family, I discovered that my sister is as much of a geek as I am. She has surfed the Net and shared three wonderful audio book sites with me: freeclassicaudiobooks.com,
www.audiobooksforfree.com and www.gutenberg.org (which have free text and audio books). These sites allow you to download audio books in mp3 format for free. The trick here is to right click over the link and choose “Save Target As”. This will save the mp3 straight to your hard drive, from where you can transfer it to a DVD for your DVD player or to your mp3 player. The selection of audio books available is immense and the reason they are free is because they are old and the copyright has expired. Titles such as Huckleberry Finn by or Treasure Island are available. The books are separated into “human read” and “computerised text-to-voice conversions” and I wouldn’t bother with the computer version as it does not make for a pleasurable listening experience.
If you support South African music, visit
www.sovent.co.za.mpcharts.htm for a selection of free SA music. I recommend the video ‘Dragonflies & Astronauts’ by the Parlotones, it’s phenomenal!

Idea number three: I dropped by my local Kodak Express shop at Scottsville today and owner Paul Henman proudly showed off his Kodak Printing Kiosk. You’ve probably seen these machines in photo printing shops all around town and at Cascades, the Mall, Howick with Fuji equivalents at Hayfields shopping centre. What these nifty little numbers do is allow us mere mortals to plug and play. They have zillions of slots under the monitor which take just about any interface you can think of from CD’s, DVD’s, stiffy’s, USB memory sticks, XD-Picture Cards, Mini SD, Multimedia/SD/RSMMC, Smart Media, Compact Flash to cell phones with either Bluetooth or infrared. The Kiosk siphons the photographs off your cell phone/memory stick/whatever and starts giving you printing options of photos you select. These options range from Christmas greeting cards inclusive of the photo of your choice, to ID Photos, 2008 Calendars by month or year your photo as centre piece, birthday cards, invites, announcements and refined collages of a range of your pictures. You are then guided through photographic enhancement options such as sepia or black and white conversions, as well as red eye reduction and contrast/brightness balance. It then bombards you with over one thousand border choices, background options and the ability to add your own text. It’s all touch screen and very simple. Once you have made your choices you can then print to your hearts content with print pricing as low as R2 per jumbo if you print ten or more. Greeting cards have panorama dimensions and A4 collages cost around R20. These photos are then not spewed out on a little home photo printer next to the Kiosk, in case you’re wondering, they are sent to and printed on the shops’ printing equipment and it all happens while you wait. You are even able to burn a CD with your selection of photos, which is ideal if you want to dump the pictures off of your cell phone.

Ho Ho Happy Christmas shopping to you all. You can contact the geek on
geek@witness.co.za.

Get news delivered to your desktop


Feeding Frenzy

Before I fast forward this week into RSS feeds, I need to backtrack to the last geek column on Microsoft Backup. I need to add the following bit of information as I’ve had quite a few readers telling me they cannot find Backup in their version of Windows.

The Backup utility is not included in the default installation of Windows XP Home Edition. The Backup icon is not present on the Start menu in Windows XP Home Edition, nor is Backup listed in Add Remove Programs for Windows XP Home edition. You need to dig up the Windows CD and double-click the Ntbackup.msi file in the following location on the Windows XP Home Edition CD-ROM to start a wizard that installs Backup:
CD-ROM Drive:\VALUEADD\MSFT\NTBACKUP

If you don’t come right with that, I asked a guru which free backup software he recommends outside Microsoft. He recommends Cobian and here’s the link to download it :
http://www.download.com/Cobian-Backup/3000-2242_4-10071828.html

On with the news, particularly seeing as the Witness has revamped not only it’s printed format, but totally upped its website. I noticed it now has a RSS feed. I bit the bullet and fed myself with all the information surrounding this buzzword.

RSS has been around for a good ten years, but once I started playing around with it, I got as hooked as I ever have over numerous geek gadgets I’ve investigated in the past. That is because I’m a self confessed news junkie. I crave knowing what’s happening in the world and spend at least an hour a day surfing the net for news.

RSS stands for Really Simple Syndication and is mostly used for news and blog websites. If all the information you ever wanted to read was on one website, you could just keep that website open in your web browser and refresh it every now and then, to see new stories as they get added. But with diverse interests and blogs of friends you want to keep on top of, you end up surfing to several sites frequently. But if a website had a RSS feed (and not all do), the difference is that you could subscribe to this feed and see news in chronological order.

In its simplest form a RSS feed could be viewed and added to Favourites in Internet Explorer 7. If you open a website and the RSS icon in the toolbar goes from grey to orange, that website has a feed. You can access it by clicking on the down arrow next to the RSS icon and choosing the option. In the RSS feed page, you now have the option to subscribe to this feed, and it will put the link in your Favourites (click on the star), but under the Feed tab. A web feed in Internet Explorer looks like the head and shoulders of a number of news stories listed underneath each other. If you click on one, it opens up fully.

To get the full experience and to understand why feeds are so popular, you would need to get a feed reader. They are also known as
RSS readers, feed aggregators, news readers or search aggregators.

I asked someone in the know and he recommended RSS Bandit. It’s free from
http://downloads.sourceforge.net/rssbandit/RssBandit1.5.0.17.Installer.zip and the download clocks in at 8.4Mb. Subscribing to feeds is really only viable if you have a permanent internet connection, although you can use it with dial-up, but obviously if you wanted to expand a story or update the feeds, it will only do that when you’re online.

RSS Bandit looks and works very, very similarly to Outlook Express. It has the Outlook three-windows layout, which gets you orientated fast. A feed is not that unsimilar to an email, especially a newsletter type email which allows you to “click through” to the full story. I quickly came right.

A few blogs and news feeds are preloaded to give you an idea of how to organise your own “personal newspaper” as some refer to their feed reader as, and adding a new feed only requires you to know the web address where the feed is located. The subscription wizard will sniff out the rest. So, to add the Witness web feed, you would click on New (situated in the same place as New Email in Outlook Express) and when asked for a URL, you would put
www.witness.co.za . It will sniff out the feed and allow you to add it in a folder of your choice (i.e. The News folder). It will list the feeds it finds in date order and you will be able to keep abreast of stories as they break, without having to wait for tomorrows printed edition. I also added the feed from www.news24.com and East Coast Radio’s news watch blog by using this URL : http://blog.ecr.co.za/newswatch/

Each feed can be configured individually, for example how often should the feed be updated (default is every hour) and how old the feeds can get before they fall off.

Blogs of your friends can be easily added and save you having to surf to their blog to see if something new has been posted. If there’s a new post, you will see it like an unread email. For instance, to add Zephyr, a local band’s blog, put this in the URL
http://liam-zephyr.blogspot.com when clicking on the subscription wizard. Save it under Blogs and never miss their news. Or try find the Rama lady’s blog spot? Hahaha, just kidding, but a recipe blog would make the “What’s for dinner” decision easier, hmm? Mmmwhahaha, I will convert you yet, you will all be geek housewives! Go to http://www.google.co.za/blogsearch to find blogs of your liking.

Another way to describe feeds is that content is “pulled” by the subscriber, not “pushed” by email or other means. The subscriber can also easily unsubscribe to the feed. It leaves you feeling more in control.

But technology being ever on the move, feed readers now have pod casting capabilities which can automatically download media files, such as
MP3 recordings.

Web-based feed readers are making inroads, with the Google Reader (
reader.google.com) leading the way. Here the difference is that you can use any computer with Internet and surf to your Google feed reader and see the latest feeds you are interested in as it is customised using your Google username. I can see this catching on in South Africa as soon as “getting on the net” from just about any location becomes easy and affordable.

The Witness Geek can feed you more on this and other computer related issues. Email her on geek@witness.co.za