Thursday, January 31, 2008

Contact Husbandry


The art of contacts husbandry is easily overlooked or put off for a rainy day, but in this day and age of electronic networking, that is very short sighted thinking. In the past I have harped on about “Thou shalt not steal thy co-recipients email addresses to use for spam” or “I shall hide mass email recipients in the BCC.” BCC being “Blind Carbon Copy”, not “Before Christ Computerised”, in case that was a jargon-swish.

The physical hoarding up business cards of people you need to keep in touch with is oh-so-passé because keeping this information at your fingertips involves sending an email or skyping them via your contacts list. Now a business card stuck in a fancy leather pouch just won’t do as you’d have to type the address into an email over and over again.

Right, dropped the bombshell now, have I? Contacts. Where on your computer is the best place to keep contact information, especially seeing as you want to duplicate as little as possible? It is a personal choice; you might be a whizz with databases and write one, or you might use an Internet based program such as Plaxo, or you possibly created an Excel spreadsheet or even gone out and bought a software package, but lets assume you’ve done none of the above. Let’s also assume you use Microsoft Outlook for today’s article, not Outlook Express, for your emailing needs. My suggestion is that you take a good hard look at the full functionality of the “Contacts” within Microsoft Outlook. You will be forgiven if you have only used it as an email address book, but it is so much more.

First, find it by looking for a longish “Contacts” button on the bottom left of your Microsoft Outlook screen. Change to Contacts from Mail (the default) and straight away you will see your current contacts, if any, in Address card view. Double clicking on an existing contact will show its properties, and if you have quite a few contacts, you may search for a specific contact by typing part of their name in the “Look For” window and clicking on “Find Now”. Alternatively you could use the “a to z” buttons on the right hand pane. If you have no contacts at all, adding a new contact is done by clicking on the “New Contact” icon on the task bar in the same place you would find the “New Message” button if you were in the Mail option. Essentially a “Contact” needs only two things to work: a Name (not even a surname) and an email address. After this you could “Save and Close” and start using it in your Mail program. But while you’re there, note how there are five tags to a contact, namely General, Details, Activities, Certificates and All Fields.

Browse these and start using the fields that are useful to you. The big blank area on the right in the General tag can be used for arb information that doesn’t fit elsewhere. Also, you could use a field such as “IM address” (which stands for Instant messaging) for the locally more popular Skype Address.
Note that fields which have a down arrow next to them allow for multiple entries, such as alternative email addresses.

Another tip is that if you fill in the postal address (snail mail) carefully, you can use it to mail merge in MS Word or Excel by choosing the Outlook Contacts as the database.

The Categories to which your contact can be added as seen at the bottom of the General tag can be used to group your VIP business contacts together, or, creating your own Categories under “Add to Master Category List”, your golfing friends. You can even View by category and send all contacts belonging to a set category a mass message by clicking on “View by Category”, Actions, “New Message to Contacts”. This will send a message to all Contacts who have that category in common.

That would almost be like creating a distribution list, which is done by clicking on New, Distribution List, naming the list (for example Family) and selecting members to belong to this list. A group email to this distribution list is now easy by choosing the List name.

If you want to save your typing but you wish to add a contact from an email you’ve received, proceed as follows: Return to the Mail button and double click on the email from your new contact. Hover over the email address and right click. Choose “Add to Outlook Contacts” and fill in any other bits as needed.

Back to the Contacts menu, selecting the “Activities” tag on a particular contact will invoke a search of all activities that have occurred between you and this contact, be it incoming or outgoing emails, meetings, tasks or even a birthday reminder if you’ve filled this information in. This is an ideal tracking help when your inbox overflows and you’re looking for that email that came in sometime last year. Note that Outlook wants to refresh this window every time you open the contact to make sure it’s missed nothing. Now remember your Excel hints and use column manipulation as in Excel and if you right click over the column headers you will be presented with more tools such as Sorting and adding more fields such as Sent or Received dates. Dead handy.

You can even be nice to your contacts (or business savy) and create a contact for yourself, filling in all information you wish your clients/friends to have. When you now write an email, attach your vCard by clicking on the down arrow next to the paperclip that attaches files and choosing Items instead. Now browse to your Contacts and select yourself. The recipient of the email can open and save this contact of yours (and overwrite any older information) and never be at a loss of how to get hold of you again. Perfect way to spread the word that your email address has changed, as long as people use Microsoft Outlook.

Keeping your contacts up to date and tidy and in one place is becoming one of the most important things anyone can do. The Contacts file can over time become your most valuable file, so backing it up is a must. A simple way of backing up is to open Contacts, click on File, “Import and Export”, “Export to a File”, Next, Microsoft Excel, Choose Contacts, Next, Choose a name and location for the exported file to go to, Next, Finish. This Excel file can be opened and used in Excel however you see fit, or you can use it to import your contacts to a different computer and even import it to Outlook Express, Microsoft Outlooks’ little brother.

It pays to spend some time with this contacts database and save yourself double work in the long run.

Wednesday, January 16, 2008

New ideas with photographs


Recently I took a few photos at a friends wedding and considered how I could make an imaginative present out of them. Even without an expensive photo manipulation program such as Adobe Photoshop, there is quite a bit of ingenuity and even mischief that one can get up to.

Have a look, if you, like me, own a Canon scanner, because it comes with quite a competent program called ArcSoft Photo Studio 5, and if you’ve ever bought a printer, you will know it has oodles of software that accompanies it. My favourite photoviewer and smalltime editer, I must add, still remains FastStone which can be downloaded for free from www.faststone.org.

My digital camera came with a free photo stitcher, that makes panorama photographs right up to 360°C. You tell the stitcher which photographs are meant to fit together and in what order and it makes an admirable attempt at putting a panorama of these photos together for you.

Imagine you’re standing at the Victoria Falls and, turning on your own axis, taking photos as you go. Then your computer stitcher recreates the view all round when you get home and you can enjoy it and even share it with people who have never been there. Of course, you have to remember to take neat, slightly overlapping photographs while out sightseeing. At weddings, it can be used to create a group shot of all the guests, which would otherwise never fit on one photograph.

A fellow blogger introduced me to a fun site to add a bit of class (or tongue in cheek) to photographs. The site allows you to create custom motivational posters with your own images and quotes. The outcome, which you can download, look exactly like those awe-inspiring posters you see in your managers office with quotes such as “Persistence” or “Aspirations” written underneath a stunning picture of a super trim rock climber hanging off a cliff by a fingernail. Now just close your eyes and imagine what quote you could put beneath one of your photographs and surf to www.mobuck.com to create your very own inspirational poster. For $1, you can download a high resolution image, hence the website’s name.

This made me curious and I browsed around for similar sights and found www.magmypic.com which specialises in fake magazine covers which allow you to insert a picture of your choice. With fake covers ranging from National Geographic to GQ, there is something for every occasion, be it to build a fun birthday card for a friend or to create an avatar (which, in digital speak, is the graphical representation of a user) for your facebook account. Just remember to choose an upright (portrait orientated) photograph of medium size.

So inspired was I that I carried on looking for unique ideas and found a website that had me totally bowled over. It must be one of the most creative websites out there and it’s called www.worth1000.com . It specialises in image manipulation. Every other day the site posts a contest topic, for example ‘Animal Geeks’, and invites registered users to post their manipulated and themed images. If they win, accolades follow. The best part is that the gallery of past contests is available for viewing and is mind blowing.

If you want to see a blow by blow account of how a very average model is made to look like a million bucks with nothing but makeup and photo manipulation, visit www.youtube.com and enter the words “Model Evolution with Make Up and Photoshop” into the search criteria. The video which comes up, will once and for all reveal to you how “airbrushed” our beauties of today have become and especially your teenage daughter will feel better for having seen this.

I hasten to add that my avatar (with me holding a computer chip in front of my left eye) which accompanies this article saw me in the accomplished hands of make up artist cum photographer Karen Edwards and is “only” colour manipulated. Needless to say, I was amazed at how a Geek like me can look so glamorous.

Inspired by what is possible with the right amount of imagination and dexterity, I became mischievous and decided to do some imitating on www.witness.co.za . If you are a frequent visitor to the site you will know that one is able to view past and present “front page Witness” pages, and it’s one of these I nabbed by right clicking over it and saying “Save Picture As” and squirrelling it away on my computer.

I opened my photo manipulation program. A free program called GIMP (GNU Image Manipulation Program) is available from www.gimp.org. GNU is a computer operating system composed entirely of free software, in case you were thinking wildebeest. GIMP is, as yet, inferior to Adobe Photoshop, I hasten to add.

Back to the mischief: I hacked and slashed the front page of the Witness into shape and superimposed my married friends into the front page photo and sneakily erased the headlines out to be replaced with a personal message.

All this done, I now wanted to make a sweet slide show with musical accompaniment which my friends would be able to watch on TV via the DVD player.

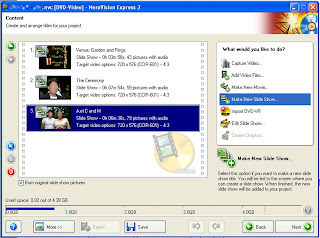
Enter Nero Vision Express. This is yet another program which is shipped free, this time with nearly every new CD/DVD burner sold. The latest version is Nero 7, but I will briefly explain how to use the more common Nero 6 version to create a slide show of all the pictures I had created using my ideas mentioned earlier.

If you open Nero (which is the software often used to burn data onto CD’s and DVD’s, there is an application called NeroVision Express in the top left part of the window. Inside here you can create your own project which can consist of a photographic slide show, or a movie or both together.

Initially, I was confused by what the difference between a project and a slide show is. Eventually I understood that a project can consist of several slide shows. The confusing part was that the program doesn’t ask you for a project name straight away, but wants the slide show name in the first step of the wizard. So I named the Project “The Wedding” and the first of 7 slide shows “The ceremony”.

To create a new Slide show, click in the top right window and “Create New Group”, then “Browse and Add to Project” the photographs you want. I recommend resizing very large photographs beforehand, so that Nero doesn’t struggle too much. I discovered that one slide show cannot contain more than 99 photos. A song or two can be added to play during the slide show. It’s fun to add “photo transition” effects or apply a random one so have the photos morph nicely from one to the next. This “Group” you’ve now created becomes a “slide show” when you click on ‘Next’. More slide shows can be added in the same way as before. Once all the photos have been added, you are wizarded onto the DVD menu creator, which allows you to use a template to make a neat DVD menu which will eventually respond to your remote control input. You then get ushered to burn the creation after which you can view it on your DVD player connected to the TV.

What a lovely gift. Visit www.tucows.co.za or www.download.com if you want to search for other free or shareware software that do similar things.

This story and other articles can be viewed on the geeks weblog at http://witnessgeek.blogspot.com/ and you can email her on geek@witness.co.za .

Thursday, January 3, 2008

Forms for Word


So you’re back with your nose at the grindstone, either already or soon, are you? Just to amuse your co-workers, why not send them a quick holiday questionnaire?

Microsoft Word has a feature called forms. Forms can be used to neatly collect data from many users (who also use MS Word) in form fields, check or drop down boxes provided. The entire look of the form and the form fields are created by you. So your imagination is the limit, and here is how it works:

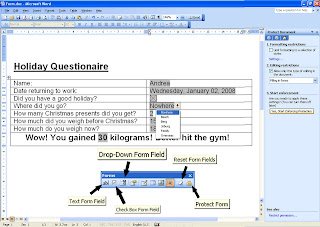
First, switch on the Form toolbar by clicking on View, Toolbars, Forms. It’s a very uncomplicated toolbar. The first three icons on the left are the ones that make the fields.

Think of it this way: A form field is the placeholder where the person filling in the form puts their answers. So if you want them to put their name, create a form field (the first icon, which has the letters ab in them) in the exact place where they should put their name. Obviously you have to write what it is they need to fill in. That would be normal text and in my example I’ve simplified the overview by making my questionnaire in the form of a table. It’s easier on the eyes.

Choose “Form Field Shading” (the ‘a’ with the stripes around) so that any form field shows up in grey.

Once you’ve got a form field inserted, you can double click on it to see all the different options. A normal text form field, for example, can be set to a specific type, namely text, numbers or dates. Special form field options include automatically inserting the current date or doing simple calculations based on previously entered information. You can add help texts for users by clicking on the “Add help text” button at the bottom of the properties box. The help text can either appear in the Status bar (the grey line which shows the number of pages and lines and columns at the bottom of the screen) or the help can show up when the user presses the Help Key (F1), or you can play it safe and add it to both.

Advanced text form field options - calculations
Also in the properties you can rename the form field by changing the name in the ‘bookmark’. If you want to do simple calculations based on other fields entered by the user, you use the name given in the bookmark. For example I created a simple subtraction formula by asking before and after Christmas gluttony weights. I then created a form field calculation which works out the gained weight and tells you to hit the gym. In that calculation field, I changed the type to Calculation and my formula reads: =After-Before .

Check please
The second icon on the form toolbar inserts a simple check box which can be ticked or unticked.

Drop Down Form Field
If you want to have a multiple choice type question, you can use the third icon (Drop Down Form Field) and once you’ve double clicked on it, you can add your own answers. You type the options one by one into the ‘Drop Down Item’ field and click on ‘Add’. The top item will show as default. You can move your inserted items up or down the list.

Done? Save the form. (See step three for optional template creation).

Step one: LOCK – not optional
The only really tricky part about forms is to set them up ready for use.
Once you’ve finished the form and you want to use it, you must lock it. Do this by clicking on the padlock icon on the form toolbar (the last icon). This will allow you (and the users) to only type in the form fields. Hide the form toolbar. Now save it again. Users can now open the form, fill it in and either save it again or print it or email it. It looks neat, can be easily viewed and even scanned.

Step two: PROTECT – optional
If you want absolutely nobody to be able to tamper with your form, don’t only lock the form, but protect it. Do this by clicking on Tools, Protect Document and note how the Task Pane on the right hand side now has three steps waiting for you. Tick Step 2 and change the drop down list to ‘Filling in Forms’. Then, in step 3, click on ‘Yes, Start Enforcing Protection’. You will be asked for a password.
For heavens sake, don’t loose this password if this is an important form. I’ve never found a way to crack back into a word document once it has been password protected!

Step three: TEMPLATE – optional
If you want a squeaky clean entry form every time a user opens the form, but you want to keep a saved copy of every user, the best way to make sure your form isn’t overwritten is by turning it into a template. To do this, click on File, Save As and choose Word Template in the ‘Save as Type’. This will create a template much like the fax templates available. Tip: Don’t change the location of the template from the one the computer recommends, else it can’t find it. Once saved, close the template, click on File, New and see your template appear in the General Templates place. Unfortunately this will only work on the computer you’re working on, not anyone else’s. You have to copy it to each PC that needs it.

Serious uses of forms:
• Capture information about people applying for one of your services, i.e., school application, or subjects to be taken at a learning institute.

• Basic order/quotation forms which do simple calculations based on entered information.

• Internal Company questionnaires required by HR departments.

• Marketing surveys and other type of polls.

Note: Microsoft Word Forms do have their drawbacks. They are not real data capturing tools as there is no database attached to the form that just adds each entry to it as it is filled it. It only simplifies and neatifies the filling in process. Adding this information to a database still has to be done afterwards by a data capturer.

Look up past, present and future articles on the Witness geek’s blog at http://witnessgeek.blogspot.com/ or check on http://blogs.24.com/ under the user KeenEye.